
- Technical scope & architecture
- Installation — prerequisites, manual & guided paths
- Configuration — gateway, auth, backend, in-app system settings
- Usage — administration, environments, snapshots, diffs, deployments, user stories
- Upgrade & migration
- Release notes
- FAQ
Architecture & technical scope
The 3C Release Manager is a 3-tier web application deployed on a Java-based technology stack with secure external integrations to Automic. Understanding the architecture helps with sizing, troubleshooting, and integration planning.
Architecture overview

User access layer
- End users access the system via HTTPS.
- Traffic is encrypted end-to-end using TLS.
- Requests are directed to the web front end hosted inside the 3C Release Manager environment.
Application layer
The core application is deployed within a Tomcat application server and consists of two main components:
Front End
- Implemented using Angular.
- Served by Tomcat as part of the 3C Release Manager application.
- Responsible for user interface rendering, client-side logic, and communicating with the backend via REST APIs.
Back End
- Implemented using Spring (Spring Boot / Spring Framework).
- Exposes a RESTful API consumed by the Angular front end and external systems (Automic).
- Handles business logic, authentication/authorization, and database access.
- Communication between front end and back end occurs via REST.
Data layer
- Uses PostgreSQL as the relational database.
- The backend connects to the database using JDBC.
- The database stores all persistent 3C Release Manager application data.
System integration
- The system integrates with Automic.
- Multiple Automic instances (system / clients) supported.
- Communication uses a Java API.
- Transport security is enforced using TLS.
- Connections are initiated from the 3C Release Manager backend to Automic clients.
Security & communication overview
HTTPS/TLS is used for all external communications: User → Front End and Backend → Automic. Internal communication uses REST between frontend and backend, and JDBC between backend and database.
Logical architecture summary
- Presentation tier: Angular front end
- Application tier: Spring-based backend on Tomcat
- Data tier: PostgreSQL database
- Integration tier: Secure Java API integration with Automic
Requirements & compatibility
The minimum technical requirements for deploying and operating the 3C Release Manager application.
Operating system
The 3C Release Manager is platform-independent and can be deployed on:
- Microsoft Windows (64-bit)
- Linux (64-bit) — any modern, vendor-supported distribution (e.g. RHEL, Rocky Linux, Ubuntu LTS)
The operating system must support: Java 21, PostgreSQL 15, Apache Tomcat 10, TLS-secured network communication.
Java Runtime Environment (JRE)
- Minimum version: Java 21
- Edition: Open Edition (OpenJDK)
The JRE is required to run the Apache Tomcat application server, execute the 3C Release Manager backend (Spring-based) application, and support secure TLS communication with external systems (Automic).
Application server
- Minimum version: Apache Tomcat 10
Tomcat is required to host the 3C Release Manager application, serve the Angular-based front end, execute the Java backend components, and provide REST endpoints for internal and external communication. Tomcat must be configured with Java 21 compatibility, HTTPS/TLS enabled, and appropriate memory and thread settings for production use.
Database
- Minimum version: PostgreSQL 15
PostgreSQL is used as the persistent data store for 3C. Requirements: JDBC connectivity from the 3C Release Manager backend, sufficient storage and performance for application data, secure access configuration (authentication, network restrictions).
External system integration (Automic)
- Minimum version: Automic Automation Engine V21
Automic is integrated with 3C via Java API and TLS-secured communication. Requirements: one or more Automic instances (V21 or higher), one or more configured Automic clients per instance, network connectivity between the 3C backend and Automic instances, compatible certificates for TLS communication.
Network & security
HTTPS/TLS must be enabled for user access to the 3C Release Manager front end and backend communication with Automic.
Required open ports:
- Tomcat HTTPS port (typically 443 or custom)
- PostgreSQL port (default 5432)
- Automic communication ports as defined by the Automic installation
Installation
The 3C Release Manager ships in two installation flavours: manual (full control, suitable for air-gapped or hardened environments) and guided (interactive installer script install3c.bat, faster for standard setups). Both produce the same result.
Pre-installation checks
Before proceeding with the 3C Release Manager installation, ensure that all required prerequisites are installed, accessible, and fully functional.
PostgreSQL availability
- PostgreSQL is installed on the designated database server.
- The psql command-line client is available and executable.
- A connection to the PostgreSQL server can be established using psql.
- The PostgreSQL service is running and listening on the configured port (default: 5432).
- Command-line verification: psql –version
Java Runtime / Development Kit availability
- JRE or JDK version 17 is installed (Open Edition).
- The java command is available in the system PATH.
- Java execution is functional and reports the correct version.
- The JAVA_HOME environment variable is correctly set (recommended).
- Command-line verification: java -version
Apache Tomcat availability
- Apache Tomcat version 10 is installed.
- Tomcat is running without errors.
- The Tomcat service is reachable via an HTTP URL from a browser or command line.
- The configured HTTP/HTTPS port is open and accessible.
- Browser verification: http://<tomcat_host>:<port>
Installation — manual
Perform the following steps to install the 3C Release Manager manually. The examples use generic values; ensure these are replaced with the correct values for the target environment.
- Download the latest 3C Release Manager installation package from the official distribution source.
- Verify package integrity according to internal standards (e.g. checksum, signature).
Create dedicated database user. Create a dedicated PostgreSQL user for the 3C Release Manager (example: db3cuser) with restricted privileges and the following properties: NOSUPERUSER, INHERIT, NOCREATEDB, NOCREATEROLE, NOCREATEREPLICATION.
Create dedicated database. Create the 3C Release Manager database with the following properties: Encoding UTF8, Owner db3cuser, Tablespace pg_default, Connection limit -1 (unlimited), Template template0, Collation C, CTYPE C.
Deploy the 3C Release Manager application components by copying the following WAR files to <TOMCAT_HOME>/webapps/:
- threec.war
- threec-auth.war
- threec-backend.war
- threec-frontend.war
Tomcat will automatically deploy the applications during startup.
Create the required application configuration directories if they do not already exist, then copy the logging configuration files:
| Source file | Target location |
|---|---|
| logback-threec.xml | <TOMCAT_HOME>/appconf/threec/logback.xml |
| logback-threec-auth.xml | <TOMCAT_HOME>/appconf/threec-auth/logback.xml |
| logback-threec-backend.xml | <TOMCAT_HOME>/appconf/threec-backend/logback.xml |
Gateway. Adjust <TOMCAT_HOME>/appconf/threec/application-prod.properties
| Parameter | Value |
|---|---|
| logging.config | <TOMCAT_HOME>/appconf/threec/logback.xml |
| spring.cloud.gateway.mvc.routes[0].uri | http://<TOMCAT_HOST>:<PORT> |
| spring.cloud.gateway.mvc.routes[1].uri | http://<TOMCAT_HOST>:<PORT> |
| spring.cloud.gateway.mvc.routes[2].uri | http://<TOMCAT_HOST>:<PORT> |
| spring.cloud.gateway.mvc.routes[3].uri | http://<TOMCAT_HOST>:<PORT> |
| spring.cloud.gateway.mvc.routes[4].uri | http://<TOMCAT_HOST>:<PORT> |
Authentication. Adjust <TOMCAT_HOME>/appconf/threec-auth/application-prod.properties
| Parameter | Value |
|---|---|
| logging.config | <TOMCAT_HOME>/appconf/threec-auth/logback.xml |
| capture.authorization.gateway-uri | http://<TOMCAT_HOST>:<PORT> |
| spring.datasource.url | jdbc:postgresql://<PG_HOST>:<PORT>/<DBNAME> |
| spring.datasource.username | <DBUSER> |
| spring.datasource.password | <DBPASSWORD> |
Backend. Adjust <TOMCAT_HOME>/appconf/threec-backend/application-prod.properties
| Parameter | Value |
|---|---|
| logging.config | <TOMCAT_HOME>/appconf/threec-backend/logback.xml |
| spring.datasource.url | jdbc:postgresql://<PG_HOST>:<PORT>/<DBNAME> |
| spring.datasource.username | <DBUSER> |
| spring.datasource.password | <DBPASSWORD> |
| spring.security.oauth2.resourceserver.jwt.jwk-set-uri | http://<TOMCAT_HOST>:<PORT>/threec-auth/oauth2/jwks |
Configure Tomcat context files to reference the external Spring configuration locations. Create the following files under <TOMCAT_HOME>/conf/Catalina/localhost/:
threec.xml
threec-auth.xml
threec-backend.xml
- Ensure file permissions allow Tomcat to read configuration and log files.
- Restart Apache Tomcat.
- Wait for initialisation of the database.
- Restart Apache Tomcat a second time.
- Verify successful deployment via Tomcat logs and application URLs.
Installation — guided
Perform the following steps to install the 3C Release Manager using the dedicated installation script. The examples use generic values; ensure these are replaced with the correct values for the target environment.

Enter the following directories, which have to be available:
- Tomcat HOME directory (e.g. c:/Automic/Tomcat-3C)
- Java HOME directory (e.g. c:/Program Files/Java/jdk-17)
- PostgreSQL HOME directory (e.g. c:/Program Files/PostgreSQL/17)

Enter the following database settings:
- DB name (e.g. db3c)
- DB server name (e.g. localhost)
- DB server port (e.g. 5432)
- DB user name (e.g. db3c)
- DB user password (not the postgres master password)

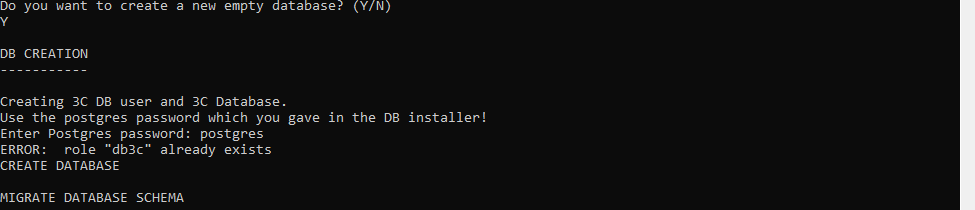



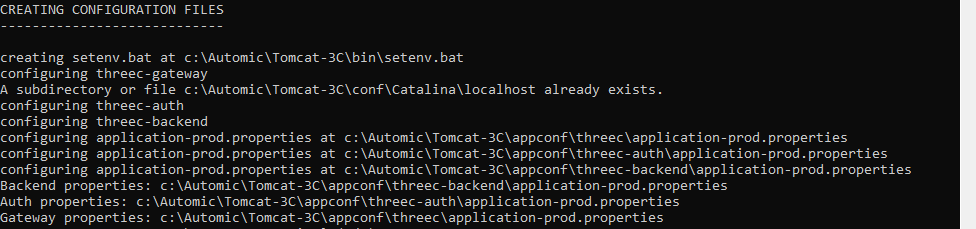
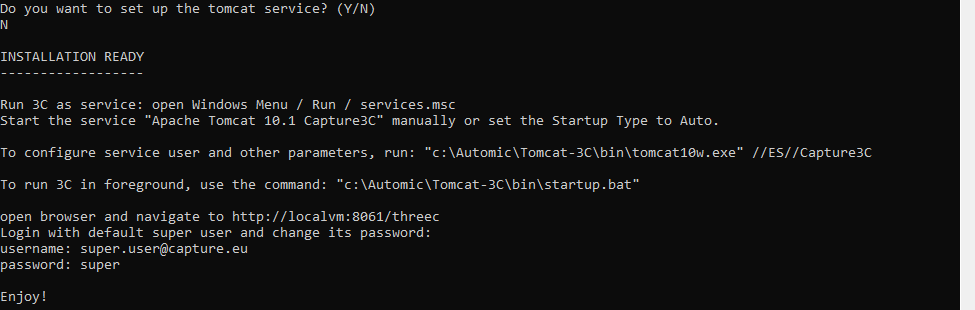
- Ensure file permissions allow Tomcat to read configuration and log files.
- Restart Apache Tomcat.
- Verify successful deployment via Tomcat logs and application URLs.
Post-installation verification
After either installation path, confirm the deployment by checking Tomcat logs for startup errors in any of the four WAR applications, browsing to the gateway URL (the 3C login screen should appear), and logging in with the default super user (see Configuration → defaults) — change the password immediately.
Configuration reference
The 3C Release Manager is configured through three application-prod.properties files, one per module: 3C-Gateway, 3C-Auth, and 3C-Backend. Beyond these properties files, several 3C Release Manager runtime parameters can be tuned by a SUPERUSER through the in-app System Settings screen. The full parameter reference follows.
3C-Gateway (threec)
The gateway module routes incoming requests to the appropriate backend service.
| Parameter | Description |
|---|---|
| logging.config | Standard Spring Boot / Java logging property. Specifies the exact location of the logging configuration file. Example: file:/c:/Automic/Tomcat-3C/appconf/threec/logback.xml |
| spring.application.name | Sets the logical name of the Spring application. Default: 3c-gateway |
| spring.cloud.gateway.mvc.routes[N].id | Defines a route ID for Spring Cloud Gateway (MVC-based). |
| spring.cloud.gateway.mvc.routes[N].uri | Specifies the target backend service for this route. |
| spring.cloud.gateway.mvc.routes[N].predicates[0] | Defines a route predicate (a condition for matching requests). Example: Path=/oauth2/** |
| spring.cloud.gateway.mvc.routes[N].filters[0] | Applies a filter that modifies the request path. Example: StripPrefix=1 |
| spring.cloud.gateway.mvc.routes[N].filters[1] | Adds a new prefix to the request path after StripPrefix. Example: PrefixPath=/threec-auth |
3C-Auth (threec-auth)
The authentication module handles login, JWT issuance, and credential management.
| Parameter | Description |
|---|---|
| logging.config | Path to the Logback configuration file. |
| spring.datasource.driverClassName | JDBC driver class used to connect to PostgreSQL. Default: org.postgresql.Driver |
| spring.datasource.url | JDBC connection URL for the database. Example: jdbc:postgresql://localhost:5432/db3c |
| spring.datasource.username | Username used by the application to authenticate with PostgreSQL. |
| spring.datasource.password | Password used by the application to authenticate with PostgreSQL. |
| capture.authorization.gateway-context-path | Defines the context path under which the gateway exposes the application. Default: /threec |
| capture.authorization.gateway-uri | Base URL of the authorisation gateway service. |
| capture.authorization.rsa-key | Contains the RSA key (Base64-encoded) used in authorisation flows. |
3C-Backend (threec-backend)
The backend module is the main application logic. It carries the largest set of tunable parameters, grouped below by topic.
Logging
| Parameter | Description |
|---|---|
| logging.config | Loads Logback configuration from an external file path (levels, appenders, log file locations/rotation, formats, etc.). |
JSON serialisation
| Parameter | Description |
|---|---|
| spring.jackson.mapper.default-view-inclusion | Enables default inclusion of properties when using Jackson @JsonView. If true, properties not explicitly in a view may still be included (can affect what fields show up in API responses). |
| spring.jackson.property-naming-strategy | Serialises/deserialises JSON properties in SNAKE_CASE (e.g. created_at) instead of camelCase. |
| spring.data.web.pageable.one-indexed-parameters | Pagination parameters are 0-based when set to false (page=0 is the first page). If true, page=1 would be the first page. |
Database & connection pool
| Parameter | Description |
|---|---|
| spring.datasource.driverClassName | JDBC driver class for PostgreSQL. |
| spring.datasource.url | JDBC connection URL. |
| spring.datasource.username | DB user used by the application. |
| spring.datasource.password | DB password used by the application. |
| spring.datasource.hikari.pool-name | Name of the Hikari pool (shows up in logs/metrics). Default: db-pool |
| spring.datasource.hikari.maximum-pool-size | Maximum number of DB connections in the pool. Default: 30 |
| spring.datasource.hikari.minimum-idle | Minimum number of idle connections kept ready. Default: 1 |
| spring.datasource.hikari.idle-timeout | How long (ms) an idle connection can sit before being retired (when above minimum-idle). Default: 30000 |
| spring.datasource.hikari.connection-timeout | Max time (ms) to wait for a connection from the pool before failing. Default: 5000 |
| spring.datasource.hikari.max-lifetime | Max lifetime (ms) of a connection before it is replaced. Often set lower than DB/network limits to avoid stale connections. Default: 60000 |
| spring.jpa.database-platform | Tells Hibernate which SQL dialect to use. Default: org.hibernate.dialect.PostgreSQLDialect |
| spring.jpa.open-in-view | Disables “Open Session in View” when set to false (prevents lazy-loading during web response rendering; generally better for performance and clean architecture). |
| spring.jpa.properties.hibernate.id.db_structure_naming_strategy | Hibernate ID generator naming strategy for DB structures (affects naming of sequences/tables used for IDs). Default: single |
| spring.flyway.out-of-order | Allows applying migrations “out of order” (e.g. if a lower version appears after a higher one has already been applied). Useful in some release flows but can be risky if not controlled. |
Security & authentication
| Parameter | Description |
|---|---|
| spring.security.oauth2.resourceserver.jwt.jwk-set-uri | URL where the app fetches the JWK Set (public keys) to verify JWT signatures. |
| capture.authorization.rsa-key | RSA key material (often a JWK/JWKS-like blob) used for signing/verification in authorization flows. |
| capture.encryption.secret.key | Application encryption secret (used for encrypting sensitive data / tokens / config values depending on implementation). |
| capture.encryption.salt | Salt used with hashing/key derivation (helps protect against rainbow-table attacks). |
| server.servlet.session.cookie.secure | Marks session cookies as Secure (sent only over HTTPS). If you are not running HTTPS end-to-end, sessions may not stick in browsers. |
License & cache
| Parameter | Description |
|---|---|
| capture.license.server.url | Endpoint of the license server (empty → either unset, disabled, or provided elsewhere). |
| capture.system.cache-time-to-live | TTL for an internal cache in seconds. Default: 86400 (24 hours). |
XOG (external system communication)
| Parameter | Description |
|---|---|
| capture.xog.timeout-in-seconds | Request timeout for XOG calls. Default: 300 |
| capture.xog.connection-timeout-in-seconds | Connection establishment timeout for XOG calls. Default: 20 |
| capture.xog.http-buffersize-bytes | HTTP buffer size in bytes. Default: 33554432 (≈ 32 MiB). Useful for large payloads. |
| capture.xog.soap-cache-time-to-live | TTL for SOAP-related cache in seconds. Default: 60 |
Scheduler & task execution
| Parameter | Description |
|---|---|
| capture.scheduler.enabled | Turns the application’s scheduler on/off. |
| capture.worker.settings.refresh.interval | How often worker settings are refreshed (ms). Default: 30000 (30 seconds). |
| capture.task.execution.pool.core-size | Core number of worker threads. Default: 30 |
| capture.task.execution.pool.max-size | Maximum threads allowed under load. Default: 60 |
| capture.task.execution.pool.queue-capacity | Queue size for pending tasks before new threads/max limits kick in. Default: 300 |
| capture.task.execution.pool.keep-alive | How long extra (non-core) threads are kept alive (often seconds). Default: 10 |
| spring.task.scheduling.pool.size | Thread pool size for Spring’s scheduled tasks (@Scheduled), separate from the custom execution pool. Default: 10 |
Parallel limits & agent intervals
| Parameter | Description |
|---|---|
| capture.limit.parallel.diff | Max parallel diff jobs. Default: 10 |
| capture.limit.parallel.snapshot | Max parallel snapshot jobs. Default: 4 |
| capture.interval.diff.populator.agent | Diff populator agent interval (ms). Default: 300000 |
| capture.interval.diff.worker.agent | Diff worker agent interval (ms). Default: 300000 |
| capture.interval.snapshot.populator.agent | Snapshot populator agent interval (ms). Default: 300000 |
| capture.interval.snapshot.worker.agent | Snapshot worker agent interval (ms). Default: 300000 |
| capture.interval.deployment.worker.agent | Deployment worker agent interval (ms). Default: 300000 |
| capture.interval.cleanup.worker.agent | Cleanup worker agent interval (ms). Default: 300000 |
| capture.interval.diff.status.agent | Diff status agent interval (ms). Default: 30000 |
| capture.interval.snapshot.status.agent | Snapshot status agent interval (ms). Default: 30000 |
Watchdog
| Parameter | Description |
|---|---|
| capture.watchdog.external-internal | Selects internal vs external watchdog mode. For on-premise: INTERNAL |
| capture.watchdog.snapshot-interval | Snapshot watchdog interval (ms). Default: 1800000 |
| capture.watchdog.diff-interval | Diff watchdog interval (ms). Default: 1800000 |
AWS integration (disabled by default for on-premise)
| Parameter | Description |
|---|---|
| spring.cloud.aws.sqs.enabled | Disables AWS SQS auto-configuration/integration when set to false. |
| spring.cloud.aws.sns.enabled | Disables AWS SNS auto-configuration/integration when set to false. |
| cloud.aws.region.auto | Disables automatic region detection when set to false. |
| cloud.aws.region.static | Sets the AWS region explicitly. Default: eu-central-1 (Frankfurt). |
Server lifecycle & error handling
| Parameter | Description |
|---|---|
| server.shutdown | Enables graceful shutdown when set to graceful (stops accepting new requests, finishes in-flight work). |
| spring.lifecycle.timeout-per-shutdown-phase | Time allowed per shutdown phase before forcing termination. Default: 3s |
| server.error.include-message | Includes exception/message in error responses (helpful for debugging, but can leak details in production). |
In-app system settings
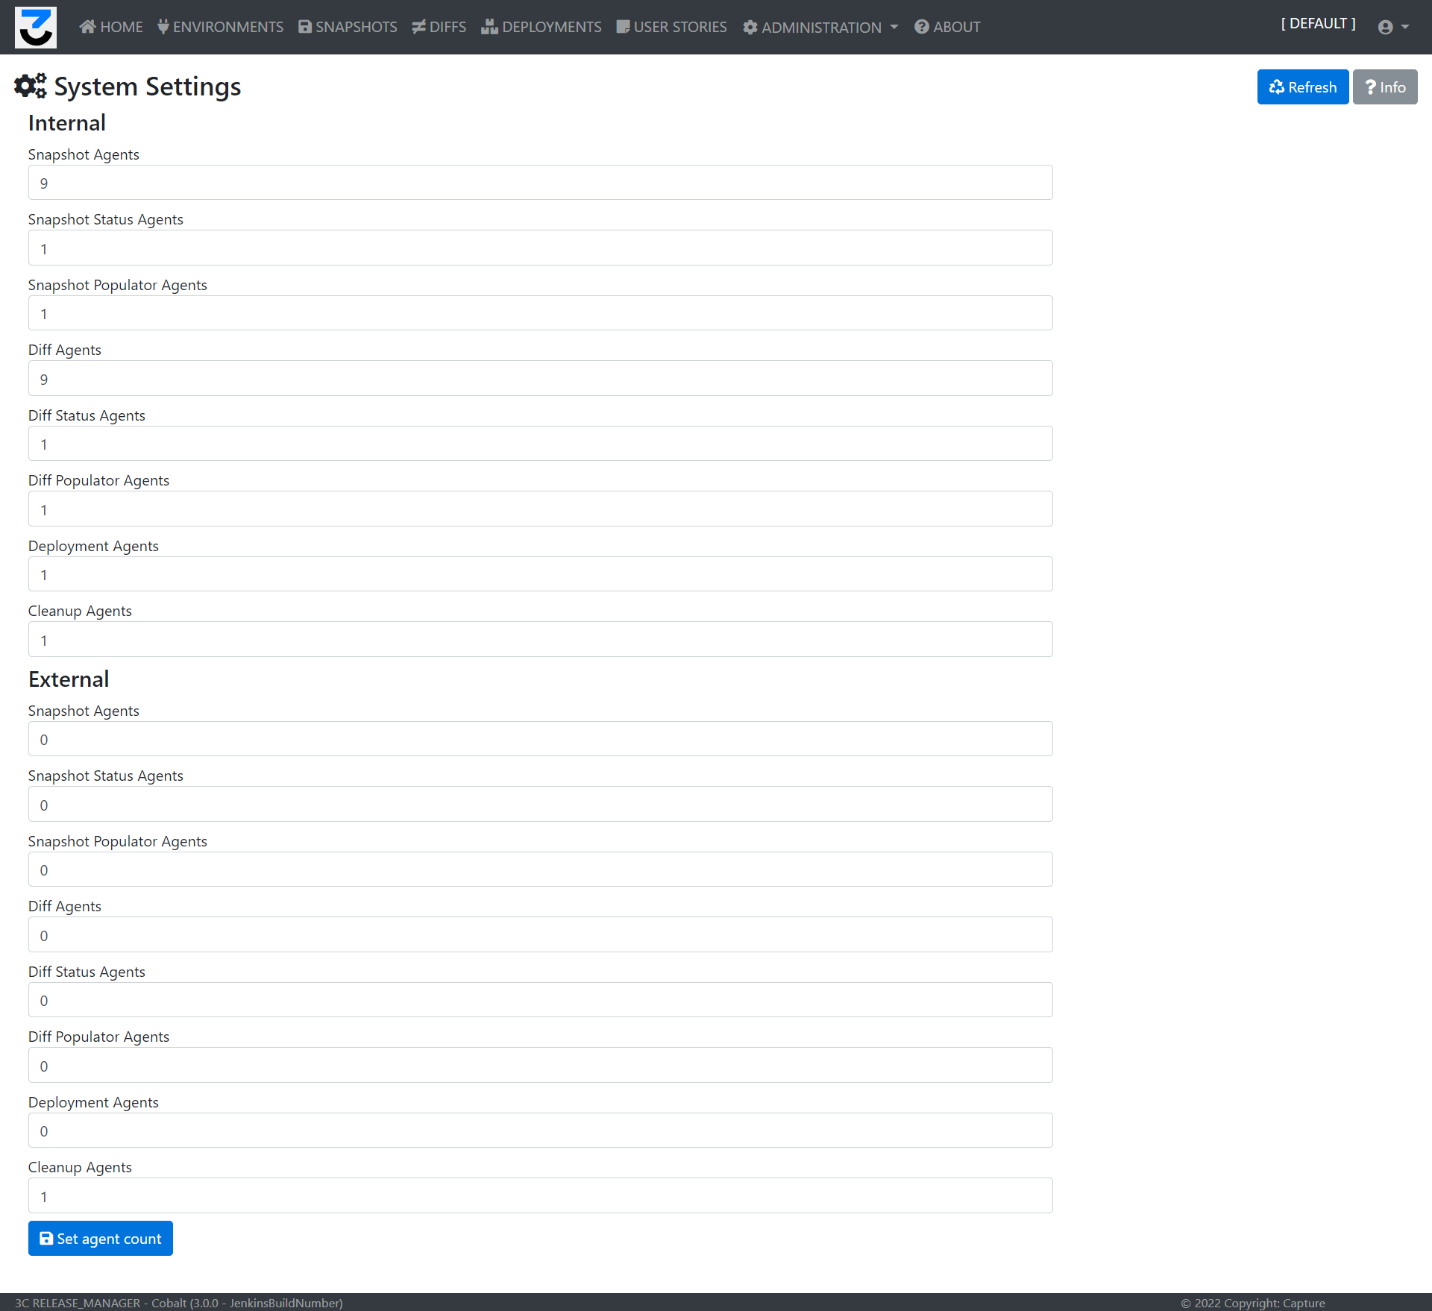
Beyond the properties files, several runtime parameters can be tuned by a SUPERUSER through the in-app System Settings screen.
Internal agents
- Snapshot agents: the number of agents that will work on a new snapshot in parallel. Too many agents can slow down the connected external system, and means a larger resource usage at 3C’s server. On older servers, with limited CPU and memory, we advise to use a smaller agent count.
- Snapshot status agents: advised to keep at 1.
- Snapshot populator agents: advised to keep at 1.
- Diff agents: the number of agents that will work on a new diff in parallel. Too many agents requires larger resources on 3C’s server. On older servers, with limited CPU and memory, we advise to use a smaller agent count.
- Diff status agents: advised to keep at 1.
- Diff populator agents: advised to keep at 1.
- Deployment agents: advised to keep at 1.
- Cleanup agents: advised to keep at 1.
External agents
Not used in on-premise versions.
Default credentials
After 3C Release Manager installation, the default super user is:
- Username: super
- Password: super
Usage — operating the 3C Release Manager
After 3C Release Manager installation and configuration, the typical 3C Release Manager workflow follows the structure: Tenants → Users → Environments → Snapshots → Diffs → User Stories → Deployments. The sections below describe each functional area as exposed in the web UI.
Layout & navigation
The general layout of the 3C Release Manager consists of the following modules: main menu, user toolbar, tables and contents.
Main layout
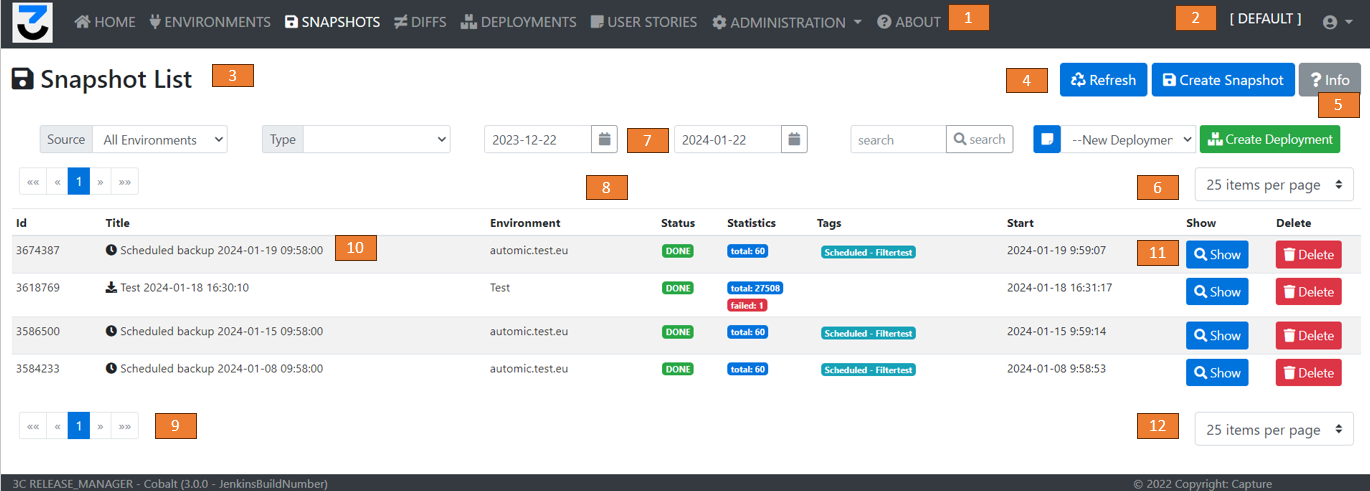
The 3C Release Manager web user interface contains the following elements:
- Menu bar
- User toolbar
- Page title
- Page action buttons
- Information and help
- Content related special actions
- List filter controls
- List content
- Paging
- List items — generally the ID and Title field opens the detail view
- List item actions, like edit, delete
- List record count control
User toolbar

Clicking on the small profile icon on the top right of the screen brings up the user submenu. The first menu item opens the My Profile screen.
Menu

The menu structure of the 3C Release Manager is the following:
- Home: this button returns you to the Home page of the 3C Release Manager.
- Environments: navigates to the Environment List page, to see the list of connected environments, or create new connections.
- Snapshots: navigates to the Snapshot List page, to see the list of existing snapshots, or create new ones.
- Diffs: navigates to the Diff List page, to see the list of existing diffs, or create new ones.
- Deployments: navigates to the Deployment Packages list page, to see the list of existing Deployment Packages, or create new ones.
- User stories: navigates to the User Story List page, to see the existing user stories, or create new ones.
- Administration:
- Tenants: only visible for the SUPERUSER
- Users: navigates to the Users List page, to manage users
- System settings: system-wide parameters
- GIT settings: Git repository configuration
- Audit Log: navigates to the Audit Log page, to see audit trail information
- License settings: a screen to manage the license key
- About: navigates to the About page, to see additional application information
The visibility of the menu items depends on the actual roles of the logged in user (see rights and roles).
Login & logout
Login
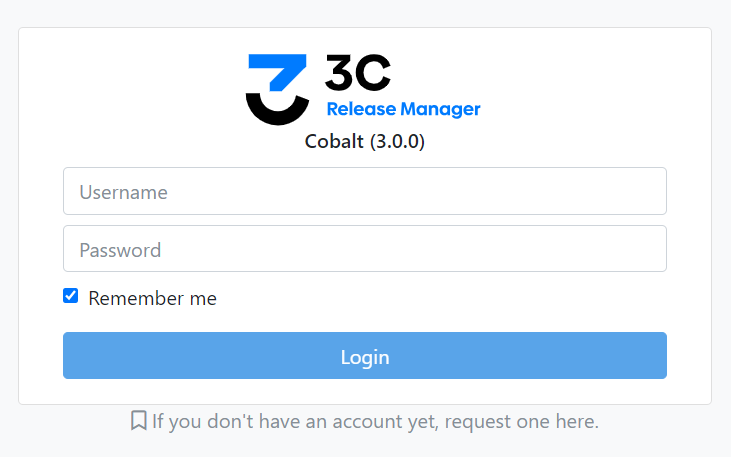
Upon entering the correct URL of the application, users are first prompted to log in on the login screen. The needed credentials are:
- Username
- Password
By selecting the Remember me option, the username will be saved for later login attempts. After successful login, users are navigated to the Home page of the 3C Release Manager.
Logout
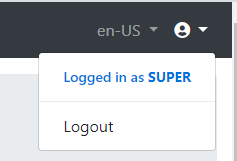
To log out of the application, users have to click the Logout action on the User Toolbar. Logging out of the application redirects to the login screen.
My Profile
My Profile page
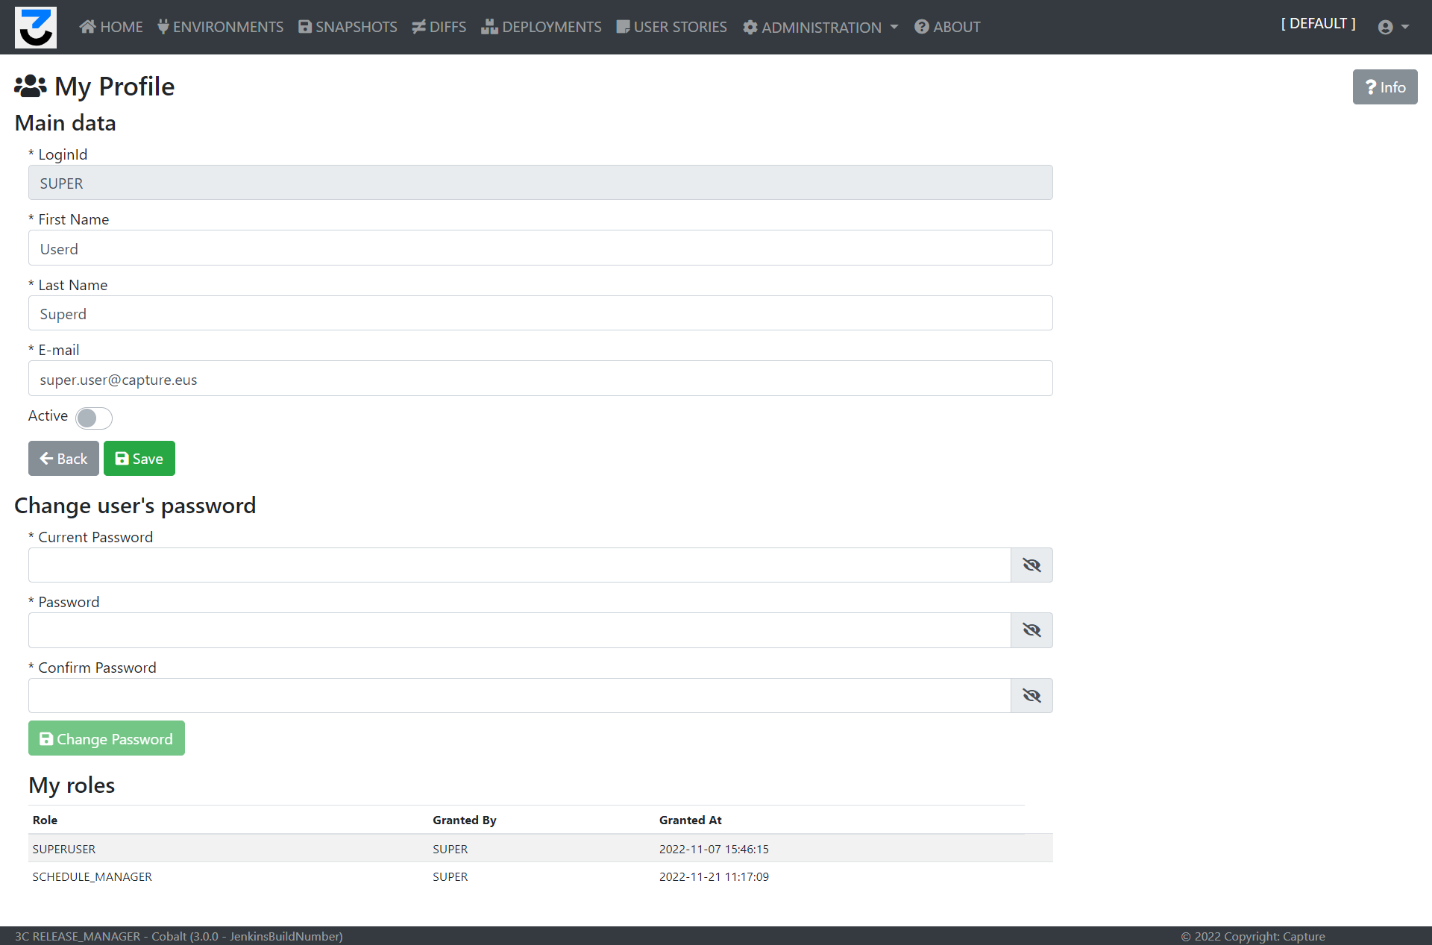
The My Profile page is structured into three sections:
- Main Data section: main personal information — Username (LoginID), First Name, Last Name, E-mail address.
- Change Password section: provides the possibility to change the current password.
- My Roles section: information about the current roles of the logged-in user. The roles can only be changed using the User details screen on the User list, by a user with the User Admin role.
Access the My Profile page
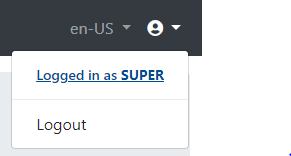
Users can navigate to the My Profile page to see and edit personal information or change their current password. To access the My Profile page, select the account icon on the User Toolbar and click on the Logged in as username action.
Edit personal information

Users can edit their personal information on the My Profile page by changing the entered information:
- First Name
- Last Name
- E-mail address
After editing, click the Save button. Upon successful saving, a notification message is shown.

Change password
Users have the possibility to change their current password on the My Profile page by:
- Entering the current password
- Entering the new password
- Re-entering the new password in the “Confirm Password” field
- Clicking the Change Password button
Upon successful password change, a notification message is shown.

Administration
This section contains all the administrative functions and setting possibilities of the 3C Release Manager application: Tenants, Users, System Settings, Git settings, Audit log, License settings. To access these functions, elevated administrative roles are required.
Tenants

Tenants are special containers in 3C representing specific companies or departments. They are only accessible by users with the SUPERUSER role. For the SaaS version, these settings are not accessible by users. For the on-premise version, it is advised to use the DEFAULT tenant, and general administrator users should be created under that tenant.
Tenants list. Shows the tenants currently available in the system. The DEFAULT tenant cannot be deleted.
Functions:
- Refresh: refreshes the current list view
- New Tenant: navigates to the Create Tenant screen
- Info: shows the information panel
Fields:
- ID: technical generated ID
- Name: the title of the tenant record
- License: active or inactive, based on the license settings
- Licensed modules: Clarity, Automic, or both, based on the license settings
- Created at: record creation time
- Edit: navigates to the Tenant Details screen
- Delete: deletes the tenant
Create Tenant. Required fields: Tenant Name (must be unique), Description (free text). After creation, users in the tenant can only access objects of the same tenant, separating them from other tenant objects.

Edit Tenant. The user can see the details of the tenant and modify some of its attributes. Fields: Tenant ID (read-only), Tenant Name, Description, Created by, Created at. Functions: Cancel, Save.

Users
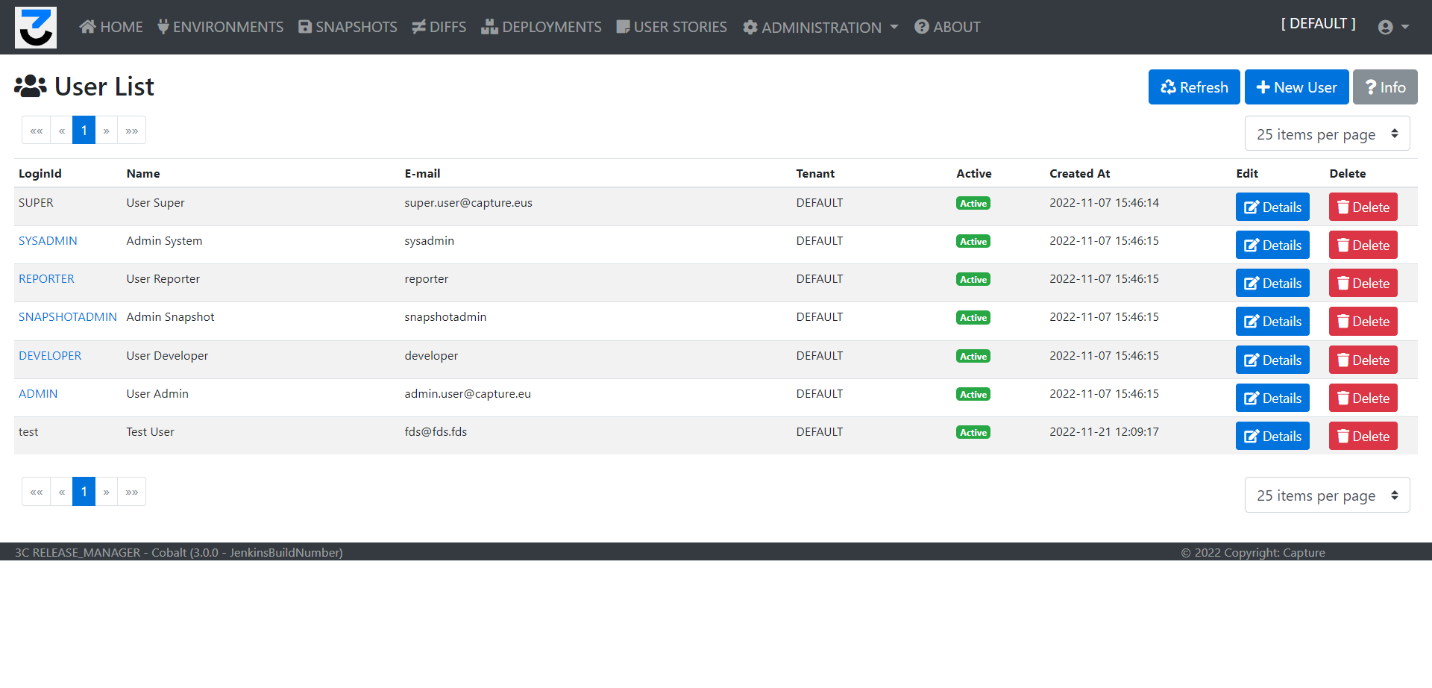
Users represent login accounts in the system. The administrative screens let you manage user details, passwords, and roles.
User list fields:
- LoginID: the ID of the user, used for logging in into 3C
- Name: real name of the user
- E-mail: the email address of the user
- Tenant: the tenant which the user is linked to
- Active: shows if the user is active (can log in to the system)
- Created at: user’s creation time
- Edit / Delete
Create User fields: LoginID (required, unique), First Name (required), Last Name (required), E-mail (required), Active (disabled by default — only active users can log in), Password (initial), Confirm password. The user’s roles can only be set after creation.

Edit User. The user can see the details and modify some attributes, change the password, or modify active roles. The LoginID cannot be changed after creation.
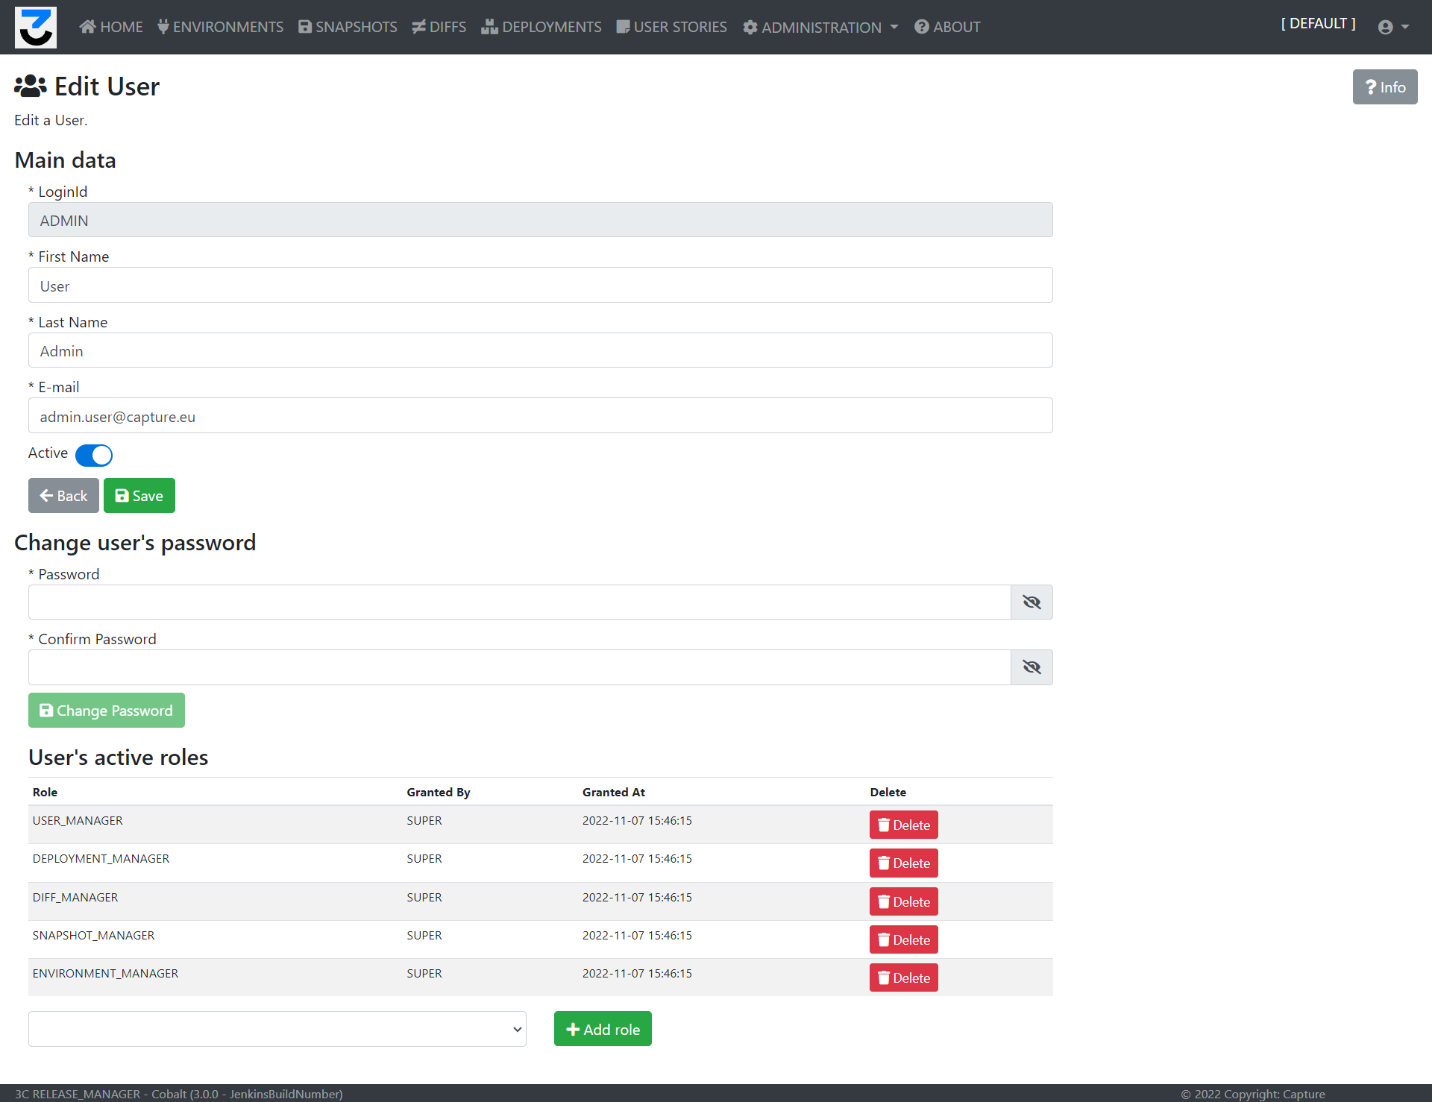
Available roles:
- USER_USER: can access the User List, and the User’s details
- USER_MANAGER: can access the User List, can delete Users, can create new User, can edit Users
- ENVIRONMENT_USER: can access the Environment List, and the Environment’s details
- ENVIRONMENT_MANAGER: can access the Environment List, can delete Environments, can create new Environment, can edit Environment’s details (including connection settings, password, filters, Git settings)
- SCHEDULE_USER: can access the Environment’s scheduled snapshots
- SCHEDULE_MANAGER: can access and modify the Environment’s scheduled snapshots, delete them or create new ones
- SNAPSHOT_USER: can access the Snapshot List, and the Snapshot’s details
- SNAPSHOT_MANAGER: can access the Snapshot List, can delete Snapshots, can start a new Snapshot, can edit Snapshot’s metadata
- DIFF_USER: can access the Diff List, and the Diff’s details
- DIFF_MANAGER: can access the Diff List, delete existing Diffs, can create a new Diff, can edit Diff’s metadata
- DEPLOYMENT_USER: can access the Deployment List, and see the Deployment’s details, including executions
- DEPLOYMENT_MANAGER: can access the Deployment List, delete existing Deployments, create new Deployments, start new Deployment processes, edit its contents
- USER_STORY_USER: can access the User Story List, and the User Stories’ details
- USER_STORY_MANAGER: can access and modify the User Stories, delete existing User Stories, create new ones, edit its contents
- SUPERUSER: can access any feature in 3C, can edit the tenants, set new license keys
Git settings

These settings are required to synchronize the connected system’s configuration with an external Git repository. It is a global, tenant-based parameter. To connect to a Git repository, the user has to set the repository’s URL and a technical user’s credentials with the ability to commit and push to that repository. Alternatively, an SSH key can be used.
Fields:
- Git Repository URL: the URL of the repository
- Connection type: Credentials or SSH
- Credentials: User Name, Password, Confirm password
- SSH: Private SSH key required by the Git provider
- Connected: after creation or modification, The 3C Release Manager will try to connect to the repository using the settings, and confirm back if the connection is working
Functions: Save saves the modified values; Test connection tries to connect to the repository using the current settings.
Audit log

This table is a representative list of the important events and actions done in the system for audit and bug tracking purposes.
Fields:
- Log ID: technical, generated ID
- Login ID: the ID of the associated user
- Log Level: the level of the message (INFO, WARNING, ERROR)
- Log Time: the timestamp of the message
- Log Message: the actual message
- Module: the originator system module’s name
License settings
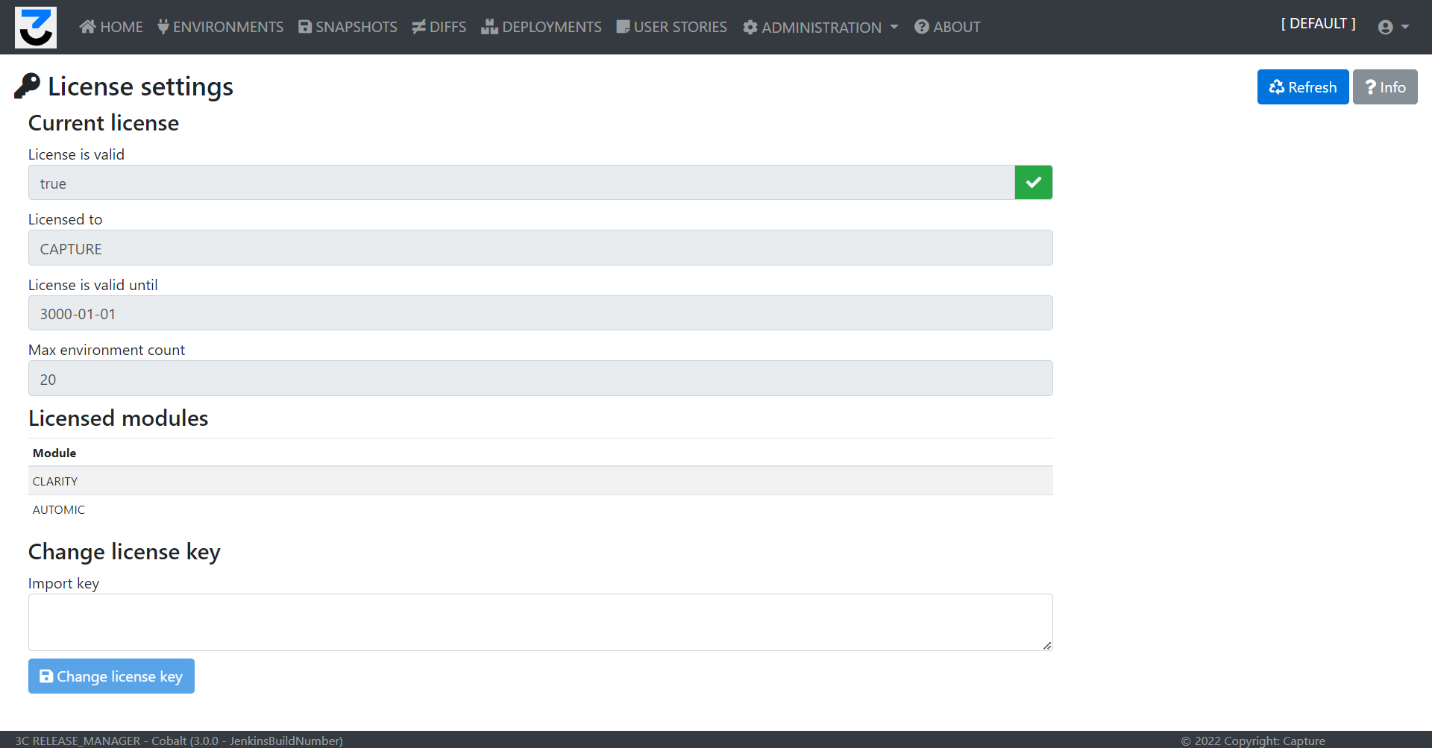
On this screen, the administrator can check and modify the actual license key.
Fields:
- License is valid: true if the license is valid and active for this instance
- Licensed to: the owner of the license
- License is valid until: the expiration date of the license
- Max environment count: the limit of the environments that can be handled with this license
- Licensed modules: the list of external systems that can be handled with 3C (CLARITY, AUTOMIC, or both)
- Change License key: the user can add a new license key
- Change license key button: changes the license key with the new one provided
Environments
Environments are connections to Automic (or Clarity) instances. They are needed for any analysis, snapshot, or deployment. A successful environment connection also provides a list of available objects of an instance to read as a top-level summary.
Environment list
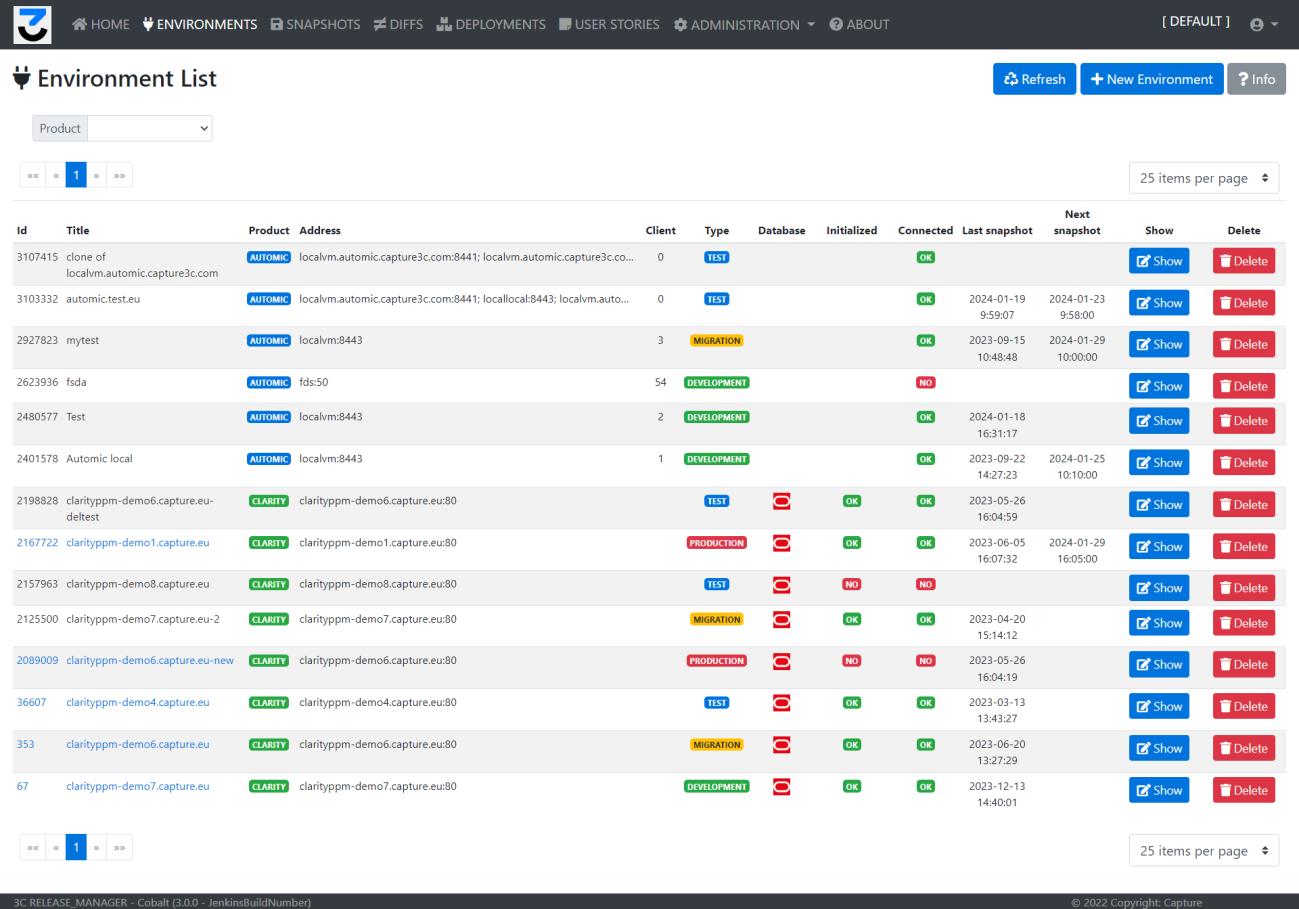
The Environment list page shows the created Clarity PPM and Automic connections and additional details about them, while providing the possibility to create, edit or delete items.
Functions: Refresh, New Environment, Info.
Filters: Product filter (only visible if your license is valid for both Automic and Clarity).
Fields:
- ID: unique identifier of the environment connection record. Auto-generated by the system.
- Title: name of the environment connection, given by the user who created it.
- Host: address of the server where the external application is running.
- Client: only visible for Automic instances.
- Type: the usage type of the environment, like DEVELOPMENT, TEST, PRODUCTION, etc.
- Database: the DB vendor of the external system. Only visible for Clarity environments.
- Initialized: shows if the necessary queries are already installed on the system. Only visible for Clarity environments.
- Connected: shows if the credentials and connection settings are correct, and 3C can access the system.
- Last snapshot: the timestamp of the last successful snapshot generated for the system.
- Next snapshot: the date of the next scheduled backup snapshot for the system.
- Show: navigates to the Environment Details screen.
- Delete: deletes the environment.
Create environment
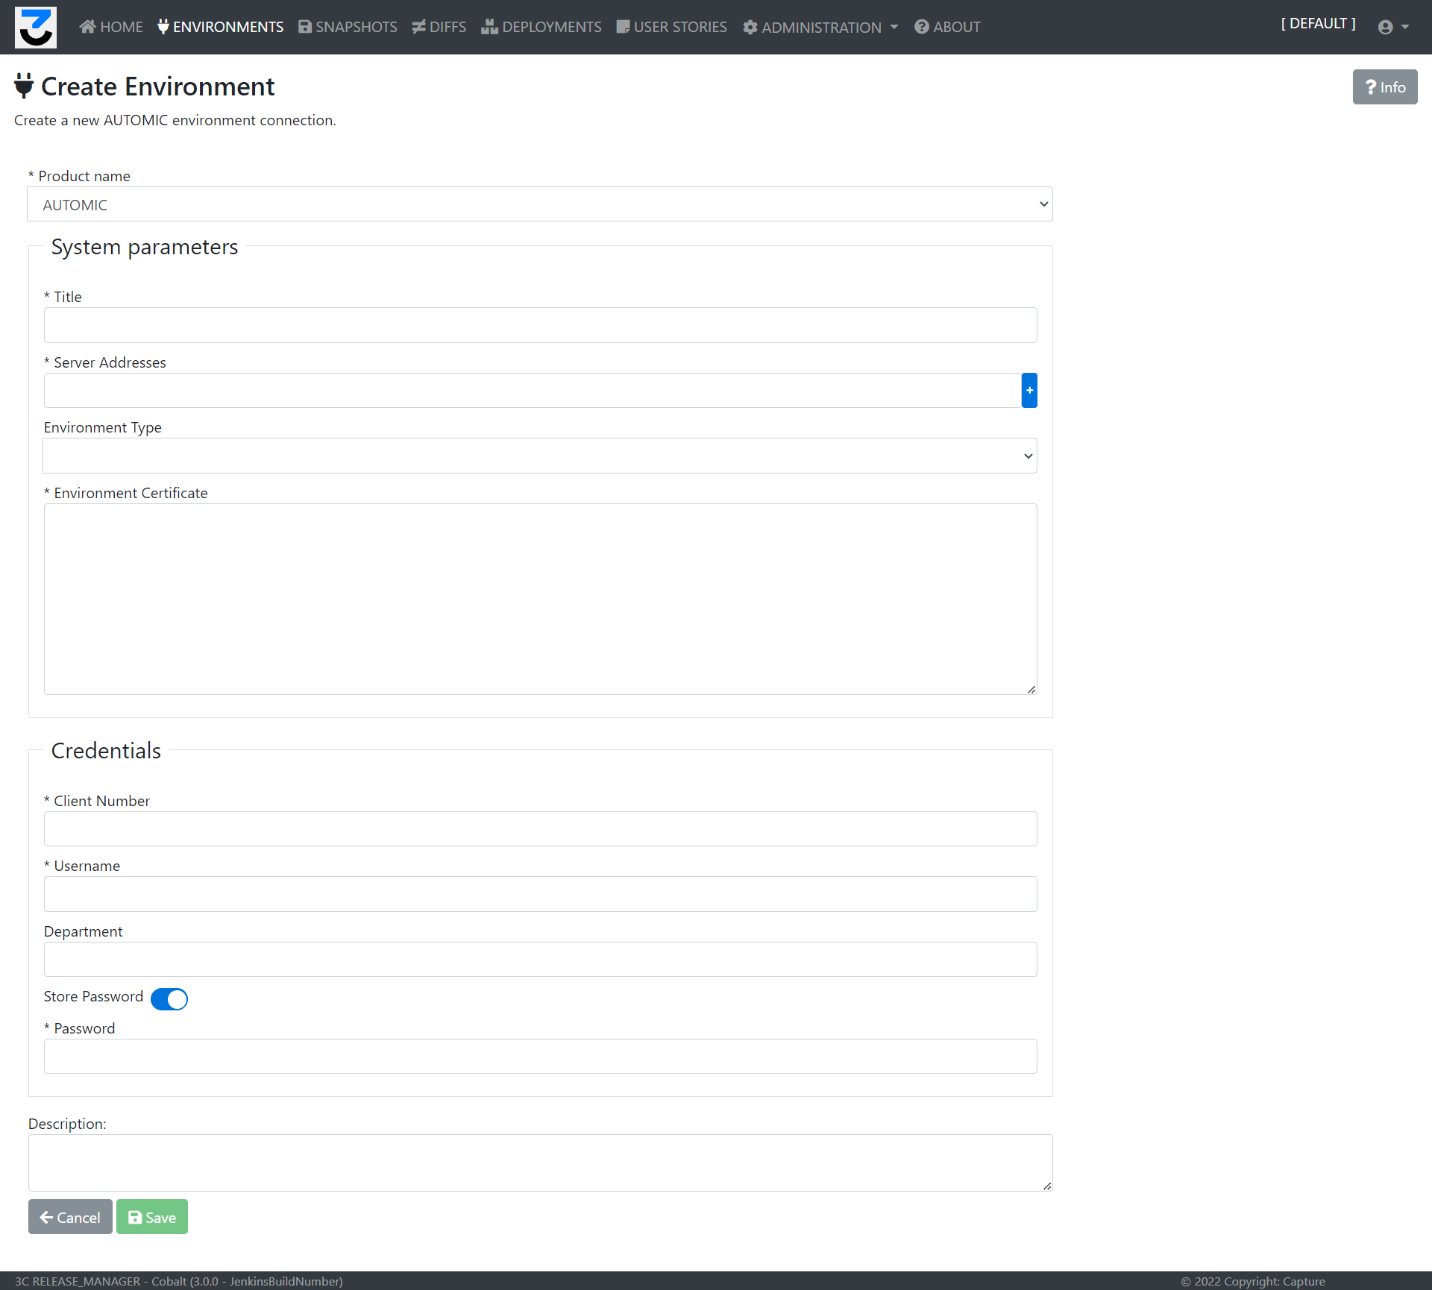
Create an environment record to store the connection details, which will be used for creating snapshots. If you have both Clarity and Automic licenses available, you have to choose the product type first.
System parameters:
- Title: short identifier of the environment. This title appears in other pages as well. Advised to be unique.
- Server addresses: address of the Automic environment in URL:PORT format, without http or https. Ports can be added by using ranges (xyurl:10-20) or commas (yyurl:1,2,3). Use the + button to add new records to the connection setting for different host names.
- Environment type: the usage type. Values: DEVELOPMENT, TEST, MIGRATION, PRODUCTION.
- Environment certificate: The 3C Release Manager needs the connection certificate. Copy the text into this field from the .cert file, including the —–BEGIN CERTIFICATE—– and —–END CERTIFICATE—– lines.
Credentials:
- Client number: the technical user’s client number in Automic.
- Username: the technical user’s username, e.g. UC. The 3C Release Manager will only be able to access (download or deploy) objects from Automic that the technical user has access to.
- Department: the technical user’s department.
- Store password: recommended. You can use 3C without it, but then before every connection request before a snapshot or deployment creation, you will be prompted to provide the password.
- Password: the technical user’s password.
- Description: free text field for additional information about the environment connection.
Edit environment
Once an environment connection is created and saved, it can be opened from the Environment List page and every related setting can be changed. Clicking on the title of the connection on the list page opens the Edit Environment page. The Edit Environment page has multiple tabs:
- Base: generic information about the environment connection
- Connection: indicators about the connection status
- Credentials: possibility to change the login password of the connection
- Scheduled jobs: automated backup snapshot generation settings for the environment
- Saved filters: user-defined object filters — only for Automic
- Filters: possibility to include or exclude certain items from the snapshots — only for Clarity
- Objects: list of identified objects
- Git Settings: to set up the Git sync for this environment
- Deployment rules: automated deployment script rules — only for Automic
Base screen
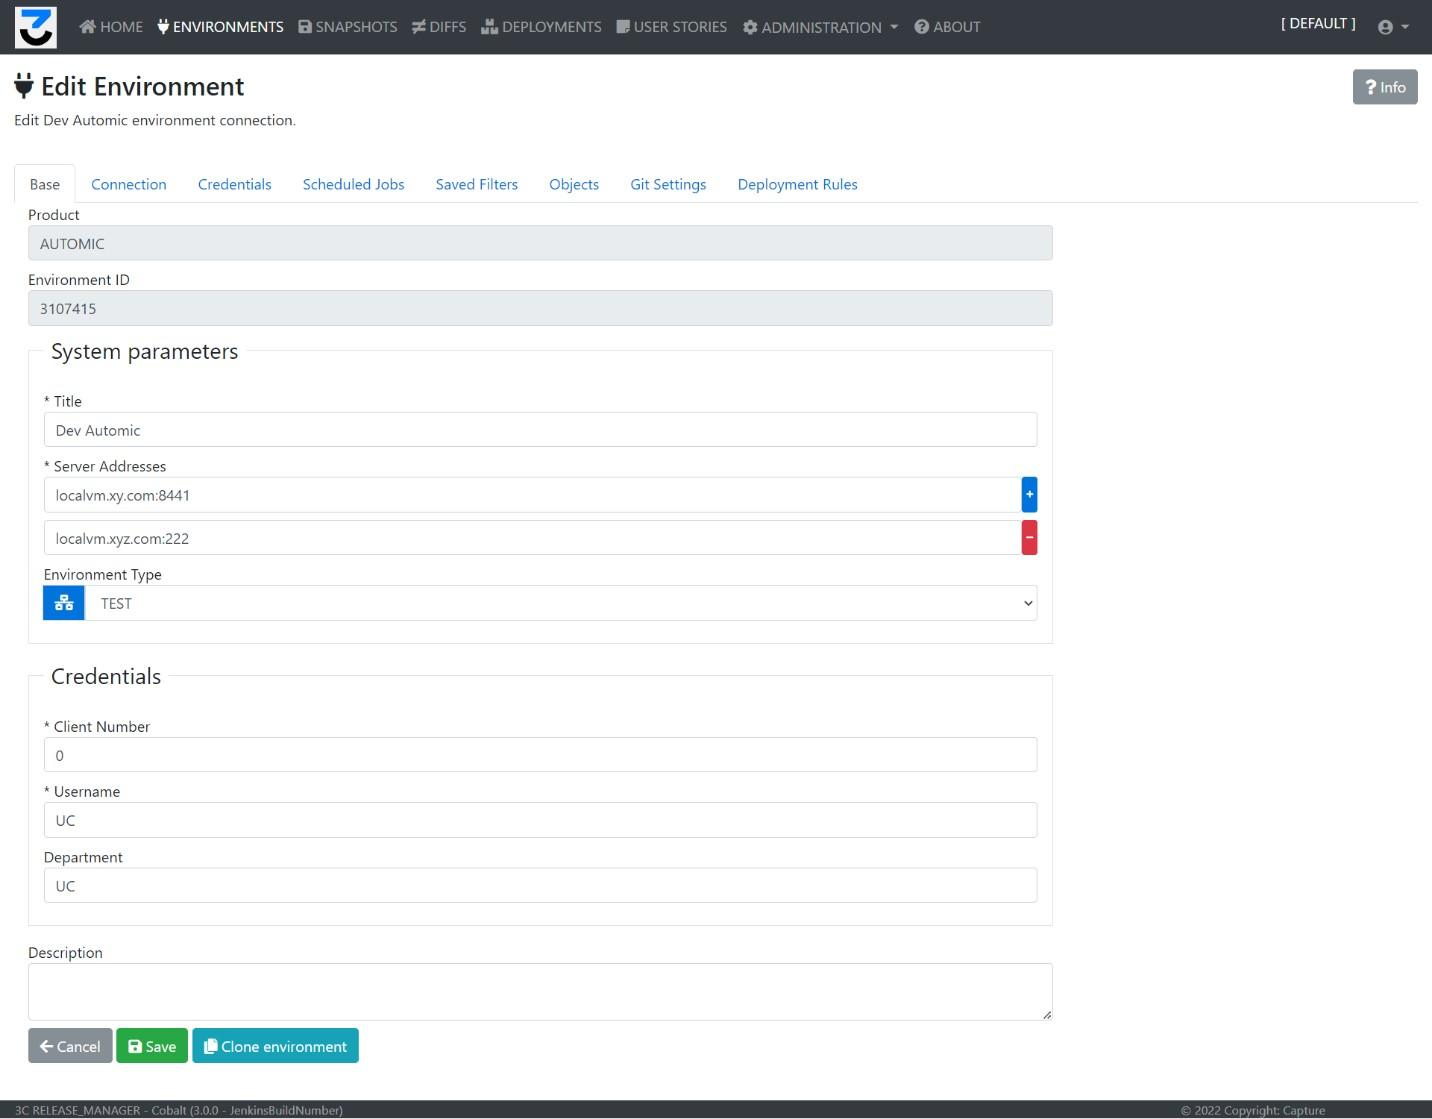
The basic connection settings and metadata for the environment. Same fields as Create Environment (Title, Server addresses, Environment type, Client number, Username, Department, Description). Functions: Cancel, Save.
Connection screen

Shows an indication about whether the connection settings are correct.
Fields:
- Connected: true if the connection is OK
- Connection error: contains the error message during the connection request if there was any (only for Automic)
- Initialized: indicates if the connection was set up properly, and the application could connect to the Clarity PPM instance at least one time (only for Clarity)
- Rest connection: indicates if the REST API is accessible by 3C (only for Automic)
Functions:
- Check connection: updates the connection’s status
- Reinitialize / Initialize: runs the query scripts in the environment that are necessary for the 3C Release Manager to work (only for Clarity)
Credentials screen

Fields: Store password (recommended), Password (the technical user’s password). Functions: Save changes (saves the new password and tries to connect to the external system), Add New (opens a dialog where the user can set the connection’s certificate).
Scheduled jobs screen

Shows the list of the scheduled snapshot jobs for this environment. The 3C Release Manager will start a new snapshot automatically to create a backup of the configuration at the times specified here.
Fields:
- Schedule title: free text title
- Active: the job will only run if the Active flag is true
- Auto diffs: if set to true, 3C will automatically create a diff analysis as well, compared to the last scheduled snapshot
- Last run: the timestamp of the last job run
- Next run: the next time the job is scheduled to run
- Run count: the number of times the job already ran successfully
- Details: navigates to the Edit Schedule screen
- Delete: deletes the scheduled job
Functions: Create schedule (navigates to the New Schedule screen).
Scheduled jobs screen — New Schedule

Use this page to define a new Scheduled Snapshot job for the environment.
Fields:
- Title: required, free text name
- Description: free text description field
- Auto diffs: if enabled, every snapshot will automatically trigger a diff analytics job as well, that will compare the current configuration with the previously last saved state
- Filter: optional — if not set, a full snapshot will be made
- Backup start time: HH:MM format. The job will start at the given time.
- Timezone: set the timezone of the backup start time
- Schedule frequency: set the frequency. The following options are available:
- Daily: every day at the given time the job will start
- Weekly: set the days of week when you want the job to start
- Monthly: set the days of month when you want the job to start
- Yearly: set the days of year when you want the job to start
Functions: Cancel (navigates back to the Schedule list without modifications), Save (creates the new scheduled job).
Scheduled jobs screen — Edit Schedule

Use this page to modify a Scheduled Snapshot job for the environment. The fields are identical to the New Schedule screen: Title, Description, Auto diffs, Filter, Backup start time (HH:MM), Timezone, and Schedule frequency (Daily, Weekly, Monthly, Yearly). Functions: Cancel, Save.
Saved filters screen (Automic only)

Use this page to manage the saved filters for the environment. When the user wants to create a custom snapshot, there is an option to save the currently used filter for future usage. This screen shows the list of them.
Fields:
- Title: the name of the filter
- Created by: the owner of the filter
- Created at: date of creation
- Edit: navigates to the New Snapshot screen, with the filters loaded
- Delete: deletes the filter
Object list screen

The objects screen gives a general configuration catalog about the environment. After every snapshot, this list is refreshed, and it can also be manually refreshed on this screen. It serves two basic purposes: firstly, you can check what objects are available in the system; secondly, you can use the History button to see the previous modifications on the object.
History view

The history view shows every previous version of the object on the left. By selecting one specific item in the list, the right view shows the actual changes in the configuration item as a text difference.
Git settings screen
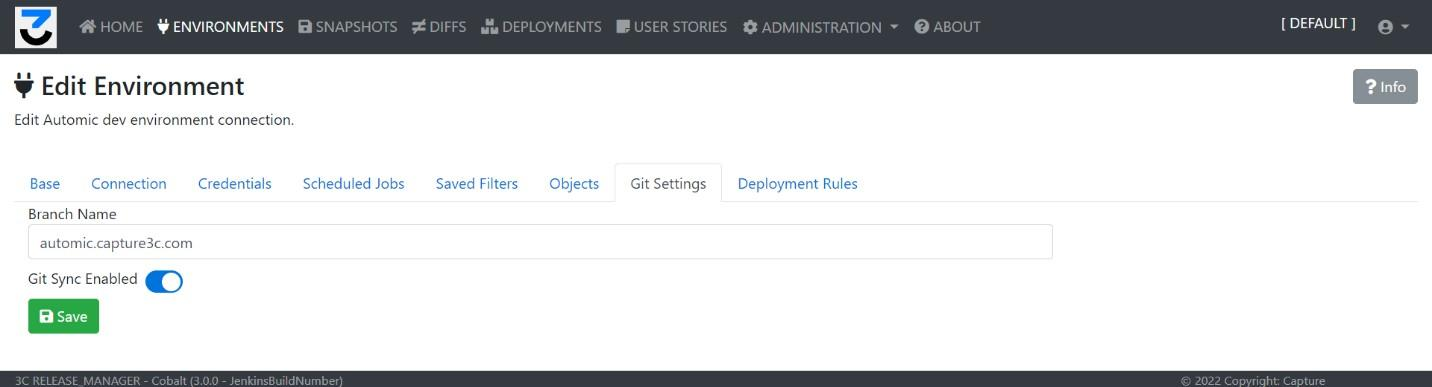
If the global Git repository is set up correctly, this page is available, where the user can enable or disable the Git Sync feature for the environment, and set the name of the branch that will be used in the repository to keep track of the configurations.
Fields:
- Branch name: this branch will be created in the repository if it does not exist, and will be used to store the configuration in.
- Git Sync Enabled: if enabled, after every snapshot The 3C Release Manager will write the configuration out in the file system, then commit and push the changes in the defined Git repository automatically.
- Save: saves the values in the form.
Deployment rules screen (Automic only)
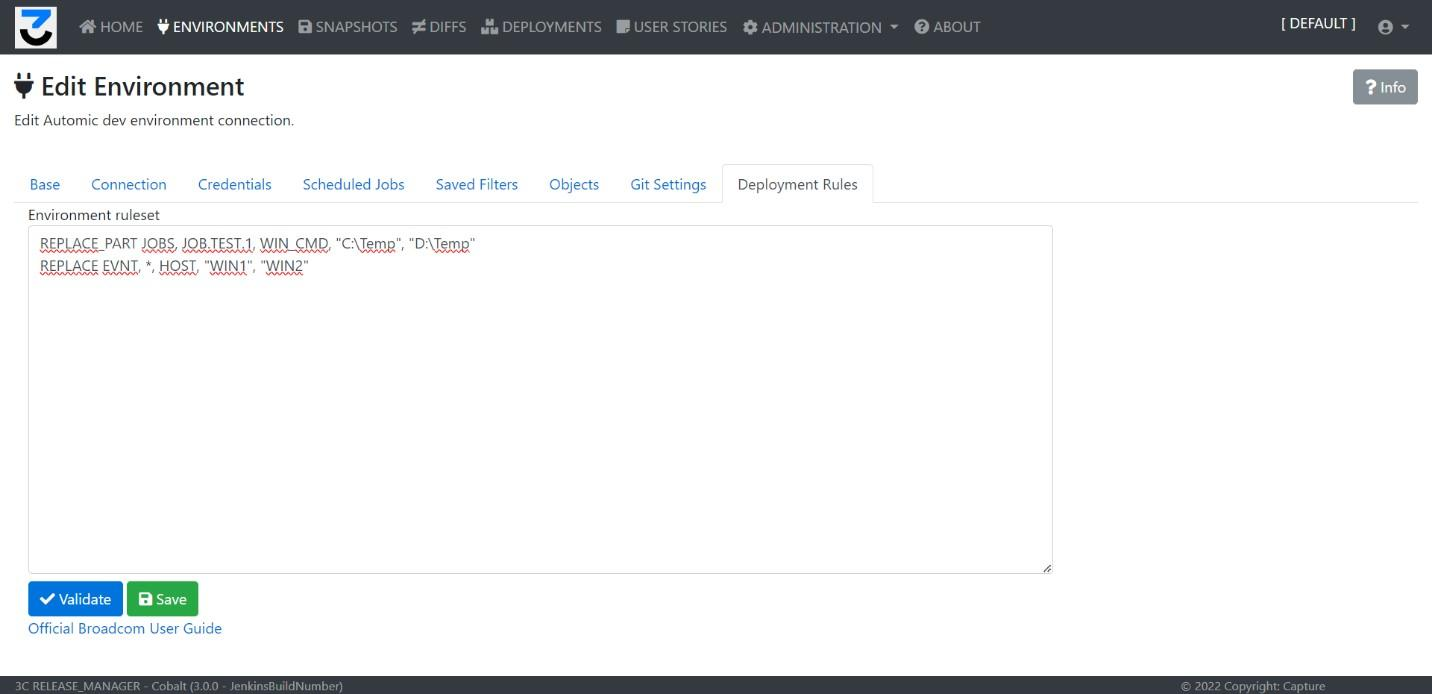
The user can set the default rules for this environment, that will be used during the deployment process. The text change process works similarly to the AEDB Change utility — the specific rules that can be used in the rule files are the same as in the Automic AEDB Change documentation.
Fields:
- Environment ruleset: the text that contains the rules (each line is one rule)
- Validate: checks the ruleset and shows an error message in case of syntax errors
- Save: saves the ruleset for the environment. Whenever a new deployment is defined for this environment, this ruleset will be copied and used as a default for the deployment.
Filters screen (Clarity only)

The user can set the specific filters for this environment that will modify how the snapshots for this instance must be created. There are three categories:
- Language filters: 3C will delete any line from the XML files that contains labels for the languages that are filtered out here
- Object filters: 3C will only include the object types in the snapshot that are enabled in this filter list
- Other filters: specific filters for the XML files, that filter out attributes, tags, or parts of the XMLs that are not necessary for the comparison analysis, like generated IDs and such
Snapshots
Snapshots are one of the basic functionalities of the 3C Release Manager. A snapshot is a representation of the managed instance’s configuration at a given time. The 3C Release Manager connects to the Clarity or Automic system, and based on the filters and settings, it will find and download every configuration object from the system. These sets can be named and saved, to be later used as configuration history, system backup, the basis of difference analytics, or the source of a deployment package.
Incremental snapshots
The 3C Release Manager exports and saves the objects in an incremental way. Whenever a new snapshot is started, The 3C Release Manager checks every object that is available in the selected system, based on the filters and settings. Only those items will be stored that were changed since the last stored snapshot, to reduce the time needed by the process and also the database consumption. The first snapshot will take longer from a fresh instance, but later on, the following snapshots will be created faster.
Full versus partial snapshots
If the user does not specify any filter or object selection, a Full Snapshot will be created — every object will be downloaded. It is advised to set up the filters in a way that only the important configuration will be saved, to speed up the process.
Snapshot list

Functions: Refresh, Create Snapshot, Info.
Filters:
- Source: the environment that was the source of the snapshot
- Type: Manually created, Automatically generated, Scheduled backup, Backup before Deployment, Deployment validation
- Date range: the snapshot start time
- Search field: free text search in title and description
Special controls: The first icon switches between User Story selection and Deployment selection. The drop-down list shows the available User Stories or Deployments to manage; if any selected, an “Open deployment” or “Open user story” button navigates to the selected item.
Fields:
- Id: the technical ID of the snapshot
- Title: the title of the snapshot
- Environment: the source environment of the snapshot
- Status: DONE, ERROR, IN_PROGRESS, WAITING
- Statistics: total number of objects in blue, errored objects in red
- Tags: user-specified or automatically created tags
- Start: the time of start
- Show: opens the Snapshot Details screen
- Delete: deletes the snapshot
- Selected items: if a deployment or user story is selected on the page, this column shows the number of objects added to that user story or deployment from each snapshot
Create snapshot

Fields:
- Snapshot title: required, automatically generated with a default value
- Selected environment: the environment connection that will be used as a source
- Description: free text
- Tags: manual tags for the snapshot
- Custom snapshot: if not enabled, 3C will start a Full Snapshot
Features: Cancel, Start snapshot.
Custom snapshot

If the Custom Snapshot toggle is enabled, the screen shows the whole configuration catalog for the environment, where the user can manually select which items should be included in the snapshot. The user can select folders (items will be downloaded recursively) or individual items. This selection can be saved as a filter using the New filter button. Previously saved filters can be applied with the Filter selector.
Snapshot creation

Based on the objects on the environment and the user’s filters and selected items, a snapshot can take a longer time. During that period, The 3C Release Manager displays a progress bar.
Snapshot details
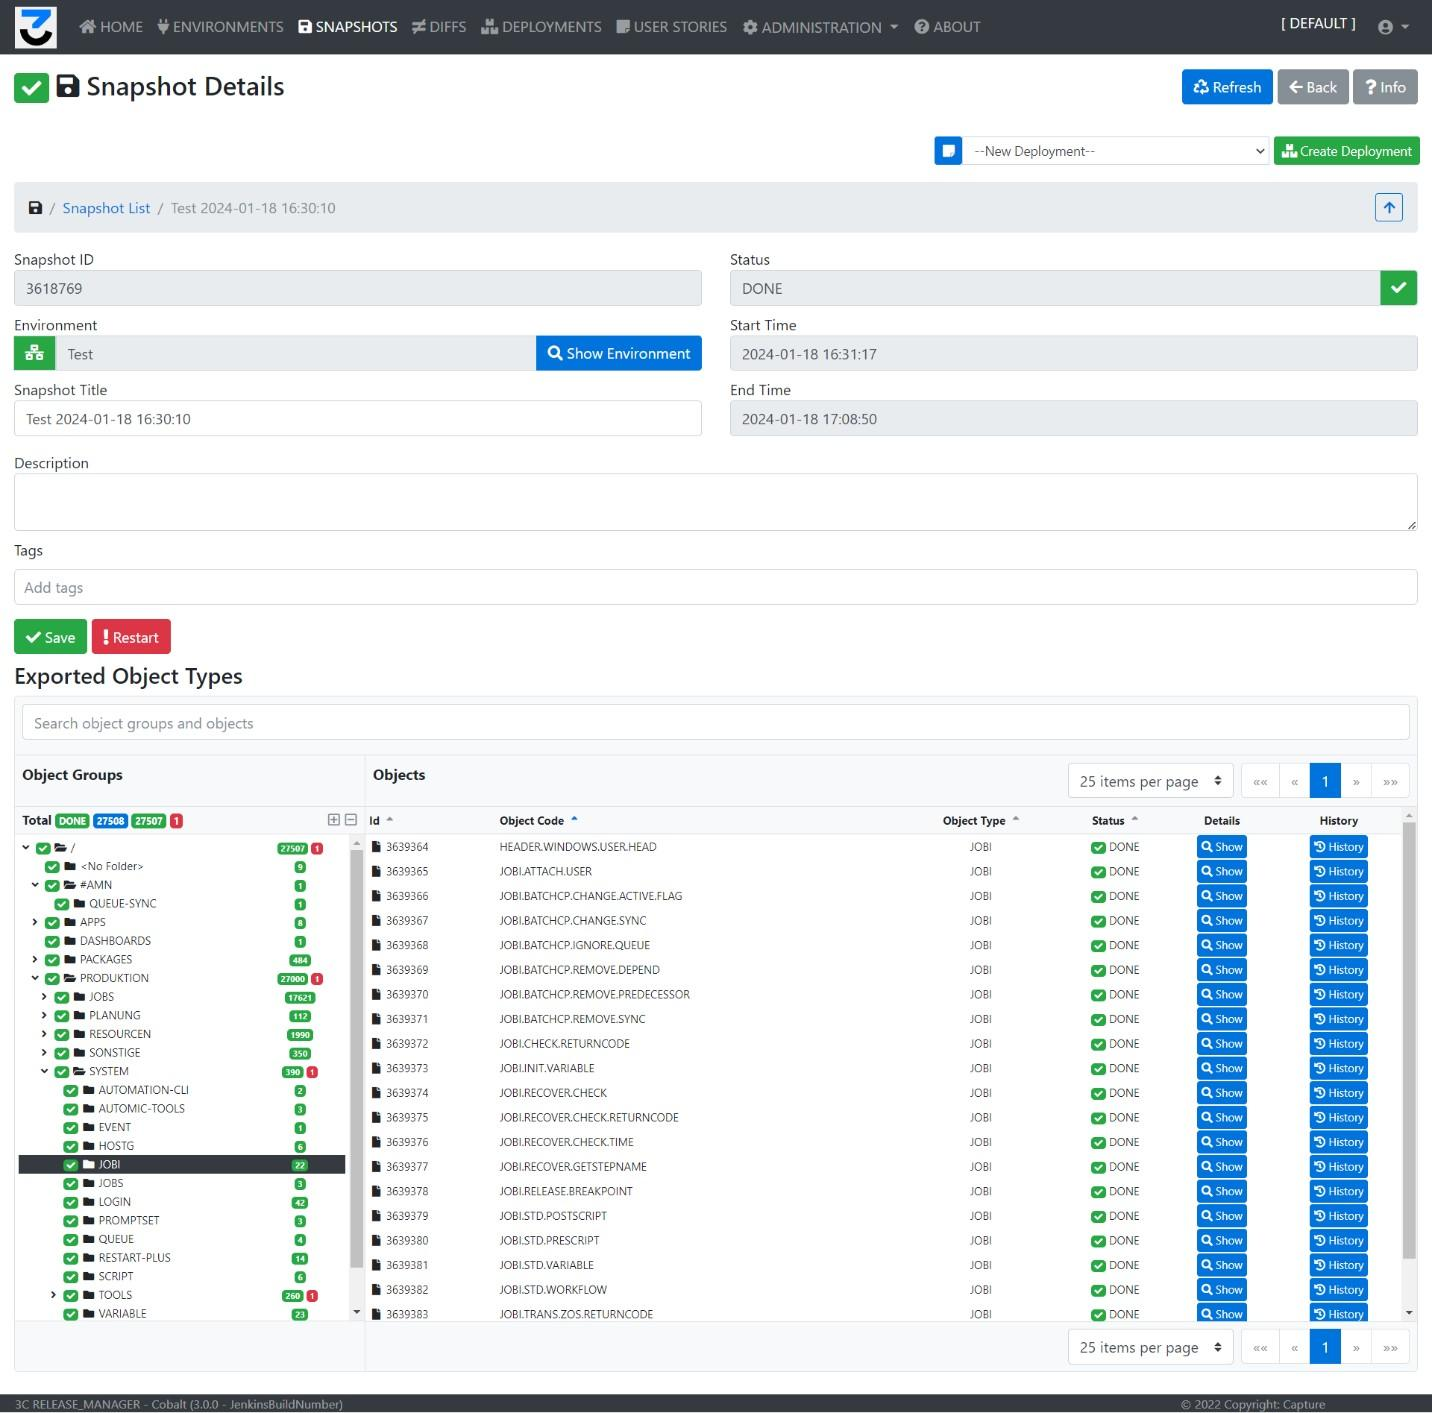
The details of a specific snapshot, including its metadata and the downloaded configuration items.
Metadata: Snapshot id (read-only), Environment (read-only), Snapshot title (required), Status, Start time, End time, Description, Tags.
Functions: Refresh, Back, Info, Save (saves changes in the metadata form), Restart — if there were objects in error state, or the snapshot resulted in error, the user can try to download the remaining objects.
Object tree view
The main contents of the snapshot. On the left side, for Clarity the Object Categories are shown in the tree view; for Automic, the folder structure of the given instance. The folders can be opened and closed; clicking on them shows the content of the folder or category on the right side.
For the whole snapshot and for the specific folders, the blue numbers show the total number of objects, the green numbers show the successfully downloaded objects, and the red numbers show the objects in error state. An object download can result in error due to connection issues, program errors, or authorization issues if the technical user does not have the necessary rights.
Fields: Id, Object code, Object type, Status (WAITING, IN_PROGRESS, DONE, ERROR), Details (opens the Snapshot Object dialog), History (opens the History view of the object).
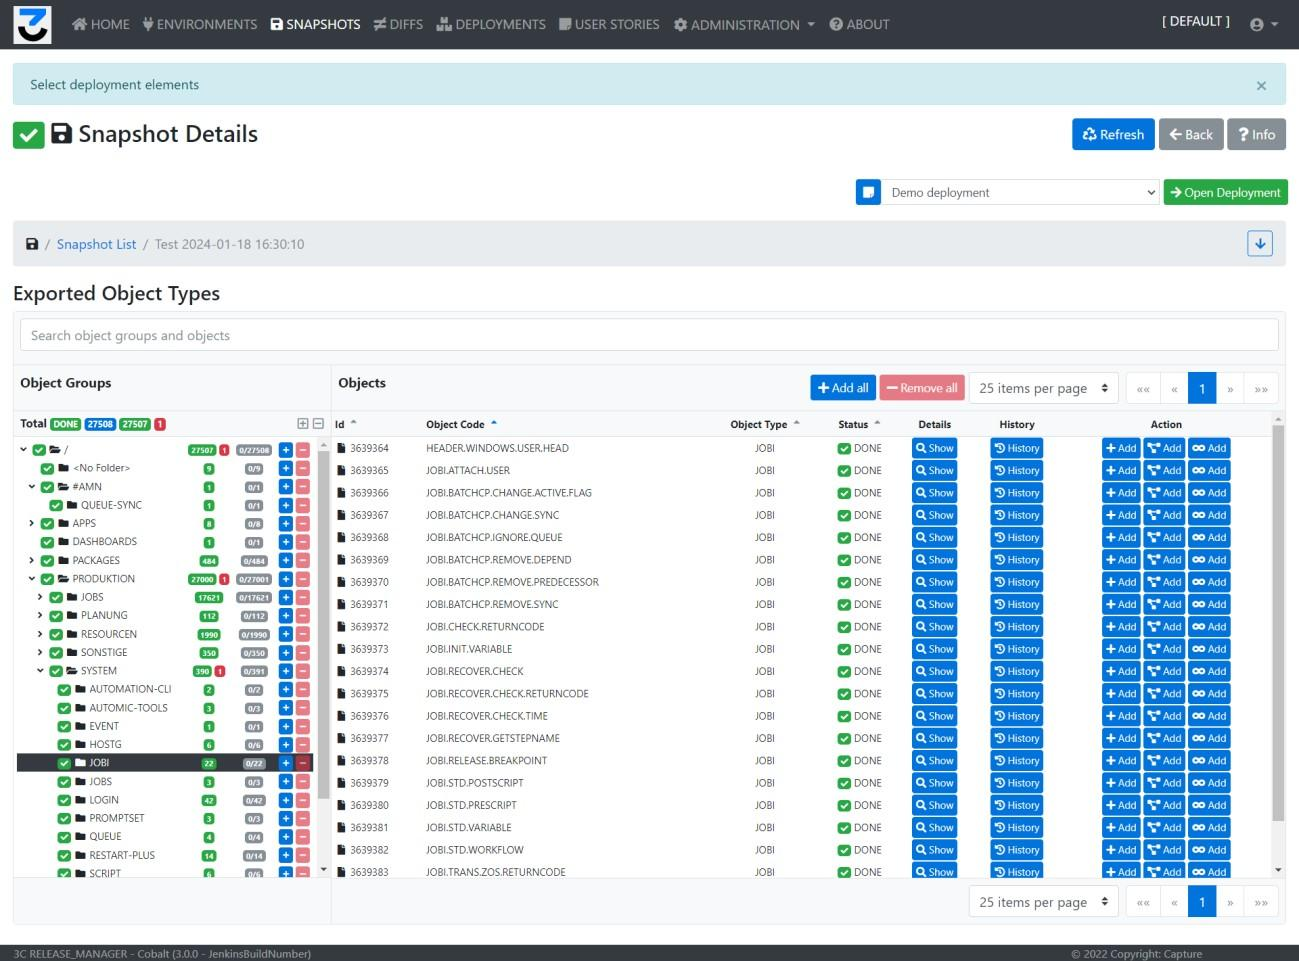
Deployment / User Story management
If there is a User Story or Deployment selected in the top right corner, the screen layout changes. With the added control, you can select folders, the content of folders, or specific items to be added to the selected User Story or Deployment.
Object details screen

Shows the details of the object, with the actual configuration code in a read-only field.
Fields:
- Id: technical ID of the object
- Code: the object’s code
- Start time: time of the object download start
- Last updated at: time of the object’s configuration change on the external system
- Object was changed: true if it was changed since the last snapshot
- Object was moved: true if it was moved from another folder since the last snapshot
- Config type: XML / JSON
- Status: the status of the export
- Object type: the object’s type on the system
- End time: the time the object was saved in 3C
- Last updated by: if available, the user’s id that changed the item on the external system
- Original snapshot: if the item was not changed, shows the snapshot’s id that first contained the current config
- Original folder: if the item was moved, shows the previous folder saved in 3C
- Content: the actual saved configuration
Diffs
The Diff analytics are the second important items in the 3C Release Manager. A Diff means a comparison between two snapshots. Based on the use case, it can be used to analyze the differences between:
- The same environment at different times — useful for daily backups and bug tracking, to collect the changes during a development phase, or to validate a deployment
- Different environments — useful to find differences between a test and a dev environment, to see what has to be deployed, to check if the test deployment is the same as it should be after development, between a prod and test environment to see what should be in the release, or between a prod and a vanilla system to collect every customisation that has been made on the system
The user can also select environments, not only snapshots — using this feature, the 3C Release Manager will create a new snapshot on the fly and use it for comparison. Diffs can also serve as source for Deployment or User Story content, like the snapshots.
Diff list

Functions: Refresh, New Diff, Info.
Special controls: User Story / Deployment selector with the same behaviour as in the Snapshot list.
Filters: Source environment, Target environment, Start time interval, Search field.
Fields:
- Id: generated technical ID for the diff
- Title: the title of the diff
- Status: DONE, ERROR, WAITING, IN_PROGRESS
- Start time: the time of the diff creation
- Tags: the tags set for the diff
- Statistics: newly created objects in green, deleted or missing objects in red, changed items in yellow, moved items in blue
- Show: opens the Diff details screen
- Delete: deletes the diff record
- Selected items: if a Deployment or User Story is selected, this column shows the number of objects added from each diff
Create diff

The user can use this screen to start a new diff process. If the 3C license is valid for both Clarity and Automic, the user must first select the product to use.
Fields:
- Source Environment: if selected, the diff process will start a new snapshot process first for the selected environment
- Source Snapshot: the list of available snapshots in 3C. The filters can be used to reduce the selection list. Either Source Environment or Source Snapshot must be selected.
- Target Environment: if selected, the diff process will start a new snapshot process first for the selected environment
- Target Snapshot: the list of available snapshots in 3C. Either Target Environment or Target Snapshot must be selected.
- Title: free text title for the diff, required
- Description: free text description field
- Tags: the user can set specific tags for a diff
- Custom Pre-Filters: the user can set specific parts of the configuration to be left out from the diff analytics, like generated IDs and such
Functions: Cancel, Create.
Diff details
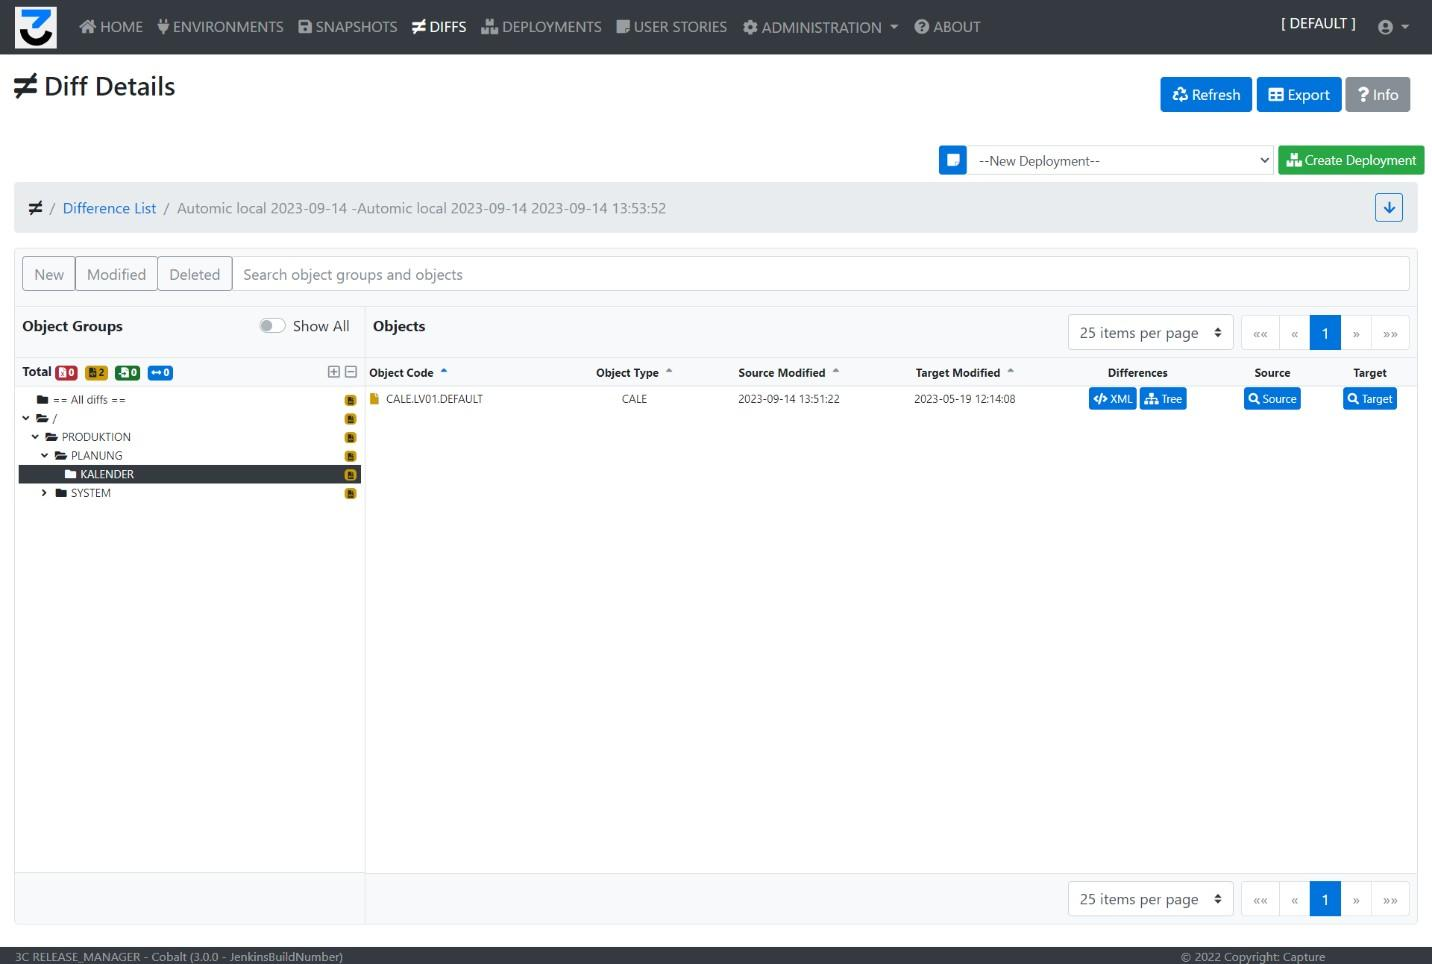
After the diff process is done, the analytics can be seen in the Diff detail screen.
Fields: Id (read-only), Title, Status, Start/End time, Source Snapshot, Target Snapshot, Description, Tags.
Functions: Refresh, Back, Info, Save.
Object tree view
Same layout as the snapshot tree view. It also displays a special record named == All diffs == that shows every diff in the right side of the screen. For the whole diff and for the specific folders, the blue numbers show the total number of moved objects, the green numbers show the newly created objects, the yellow numbers show the modified objects, and the red numbers show the objects that are missing or deleted.
Fields:
- Object code: the name of the object. The colour of the object icon also represents the change (red for deletion, green for addition, yellow for modification, blue for move)
- Source modified: the time of the object change in the source environment
- Target modified: the time of the object change in the target environment
- Differences: opens the XML or tree-view comparison screen for the modifications
- Source: navigates to the Source Snapshot
- Target: navigates to the Target Snapshot
Deployment / User Story management
If there is a User Story or Deployment selected in the top right corner, the screen changes. With the added control, you can select folders, the content of folders, or specific items to be added to the selected User Story or Deployment.
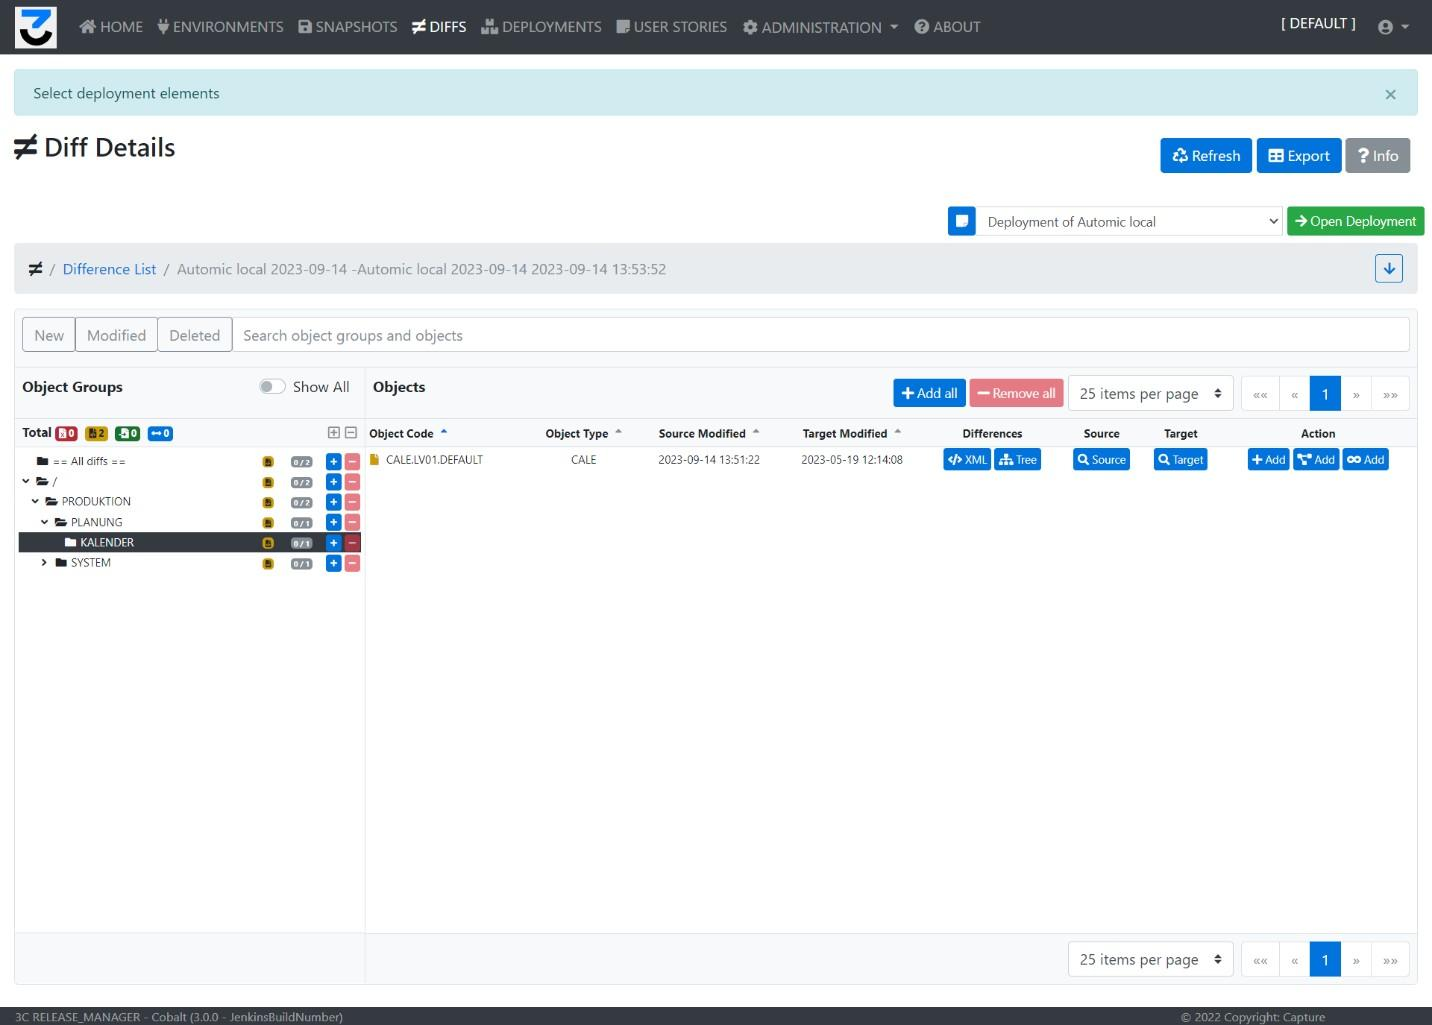
In the tree view on the left, the + button will recursively add every item under the folder to the selected object. The – button will recursively remove everything from it. The numbers in grey show how many objects are in the folder that potentially can be added, and how many of them are already added.
On the top of the list, Add all will add every item from the list shown above, and Remove all will remove the items.
On individual records there are three options: Add item adds that specific item; Add related adds the item with directly related objects; Add related recursively adds every item that is related to the actual one, with their references as well.
Diff object details

The XML comparison opens up the configuration change screen. The Source tab shows the configuration on the source side, the Target tab shows the configuration on the target side, and the Diff tab shows the differences in the XML or JSON code, using a text comparison view.
Analytics view
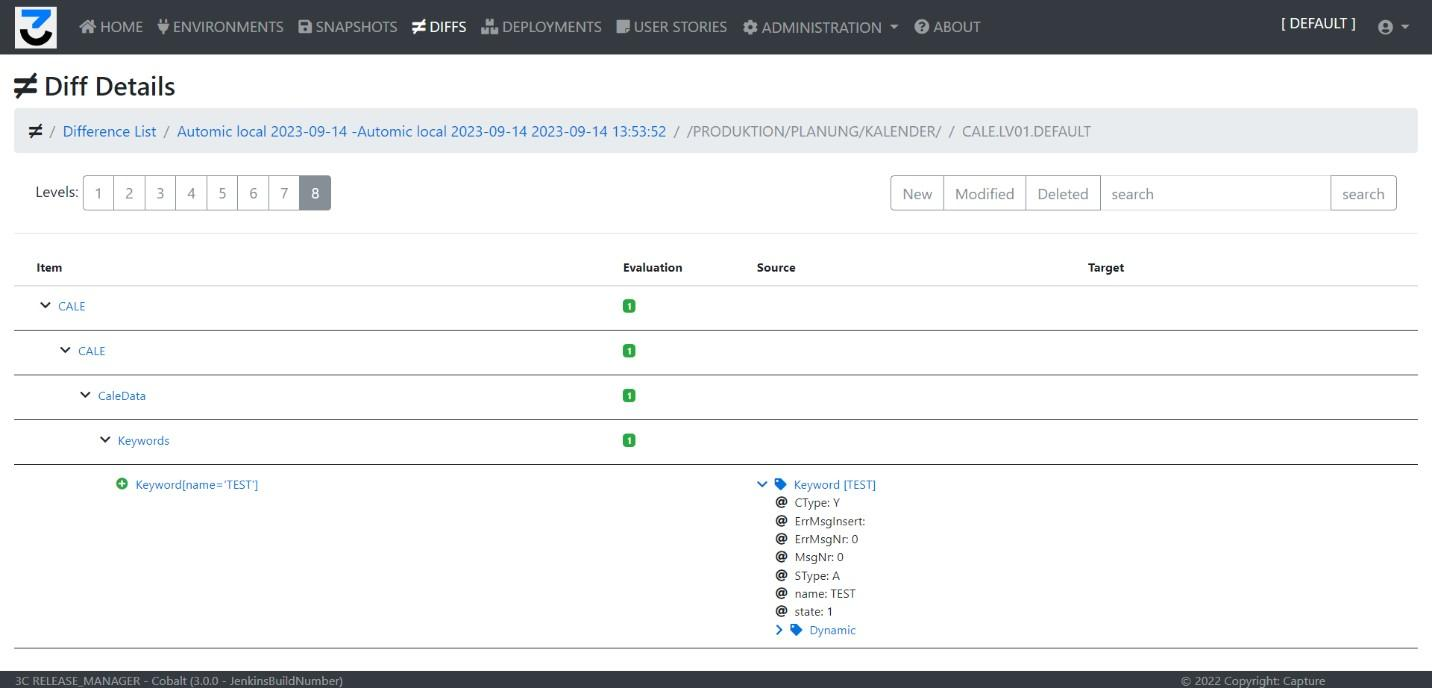
Provides another visualisation screen, where the configuration items within the object’s XML are shown in a tree view, for easier understanding.
Deployments
Deployments are the third important objects in the 3C Release Manager. A Deployment Package is a collection of configuration items that can be collected directly from snapshots or diffs, or can be added via user stories. A deployment always has a target system, where the user wants to write the collected configurations.
Once the deployment is set up and prepared, it can be started, and The 3C Release Manager will automatically deploy each step one by one in the given order. The 3C Release Manager can also create a Backup Snapshot before the deployment starts, and a Validation Snapshot after the deployment ended, so the changes can be validated afterwards. In case of an error, a Rollback Deployment can automatically be created.
Once a deployment finished running, it cannot be changed anymore, so the deployment logs can be used as a source of audit for the targeted systems.
Deployment list

Functions: Refresh, New deployment, Info.
Filters: Environments, Status selector (one or more), Creation date interval, Text field (free text in title or description).
Fields:
- Id: generated technical ID
- Title: the title of the Deployment Package
- Status: DRAFT, PREPARED, IN_PROGRESS, DONE, ERROR
- Type: Deployment or Rollback
- Creation date: time of the Deployment Package’s creation
- Target: the targeted environment
- Show: navigates to the Edit Deployment screen
- Delete: deletes the deployment
Create deployment package
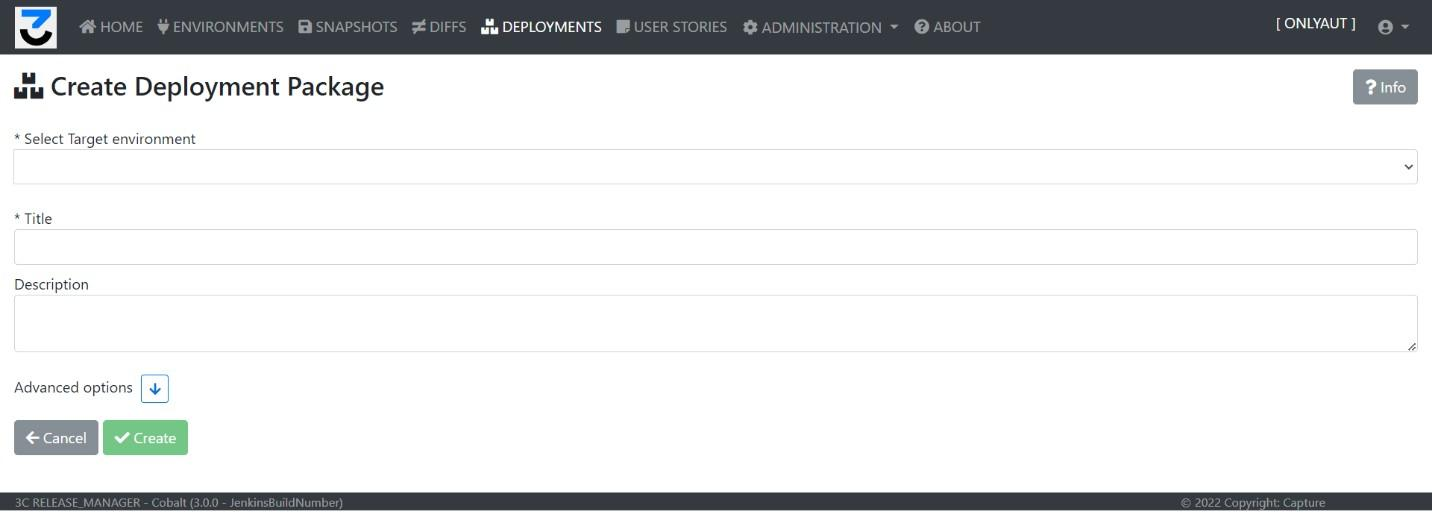
Fields: Target environment, Title (required), Description. Functions: Cancel, Create.
The additional values can be set after creation.
Edit deployment package
The Edit Deployment Package screen has 5 tabs:
- Base: the basic data of the deployment
- Rules: only for Automic, where the user can define automatic rules to run on the config items before deployment
- Prepare package: where the user can edit the deployment steps
- Run log: where the user can start and monitor the deployment package
- Validation: where the user can check the validation steps after the deployment is finished
Base tab

If there are conflicting items in the deployment steps, a warning message is shown. Another message is also shown if there are objects added to the deployment that are generally not advised to be changed in an Automic instance.
Fields:
- Title: the title of the deployment
- Target environment: the environment where the deployment will be done
- Status: the status of the deployment
- Deployment ID: auto-generated technical ID
- Deployment type: Deployment or Rollback
- Description: free text description field
- Advanced options: to manually disable Backup Snapshot and Validation Snapshot creation
User Stories: the list of the user stories that are included in the Deployment Package.
Source list: the list of the snapshots and diffs that were used as a source for the Deployment Package’s steps, directly or indirectly via user stories.
Functions: Cancel, Save, Clone deployment (clones the current deployment and creates a new one with the same content and settings), Deployment rules (navigates to the next tab).
Rules tab (Automic only)
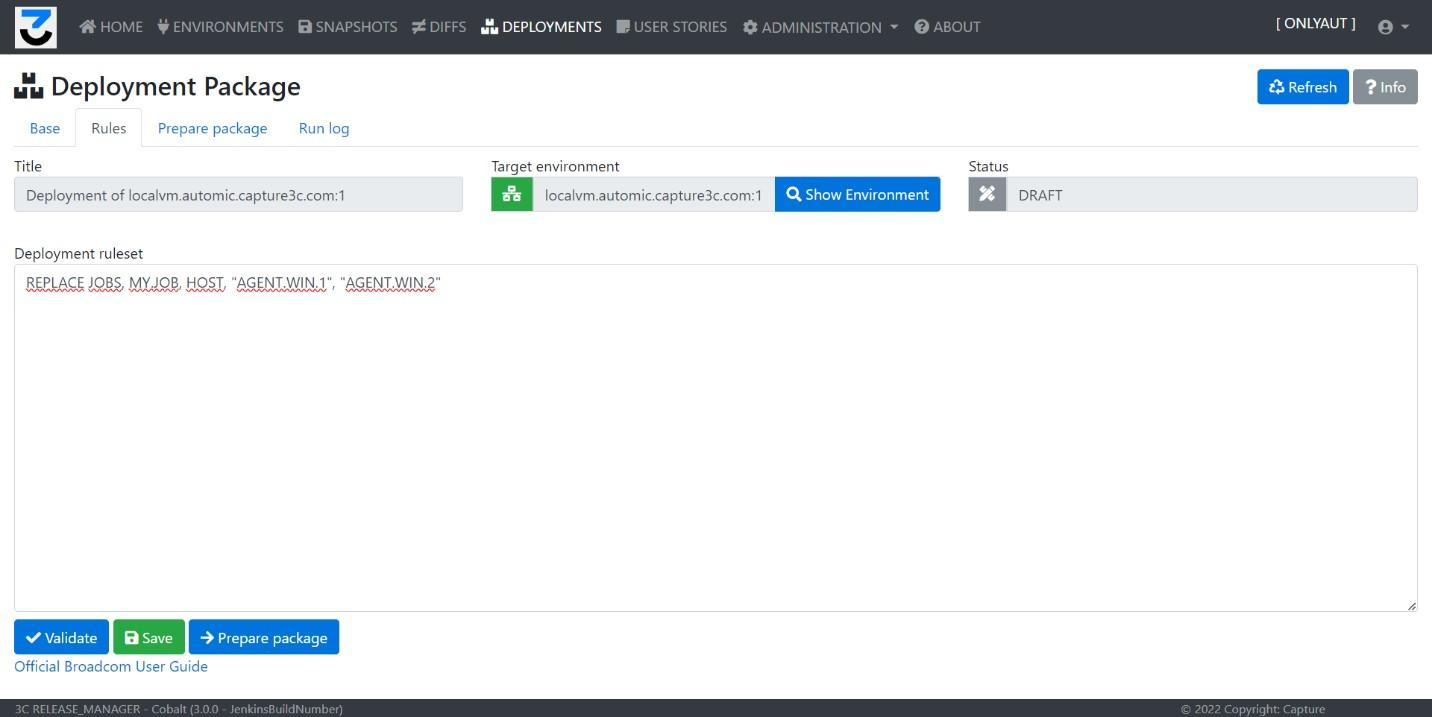
The user can set the actual rules for this deployment, that will be used during the process. If the target environment has a default ruleset defined, those will be copied here automatically, but can also be deleted by the user. The text change process works similarly to the AEDB Change utility.
Fields:
- Environment ruleset: the text that contains the rules (each line is one rule)
- Validate: checks the ruleset and shows an error message in case of syntax errors
- Save: saves the ruleset for the deployment. Any objects added to the deployment will trigger the rules and their content will be changed accordingly.
Prepare package tab
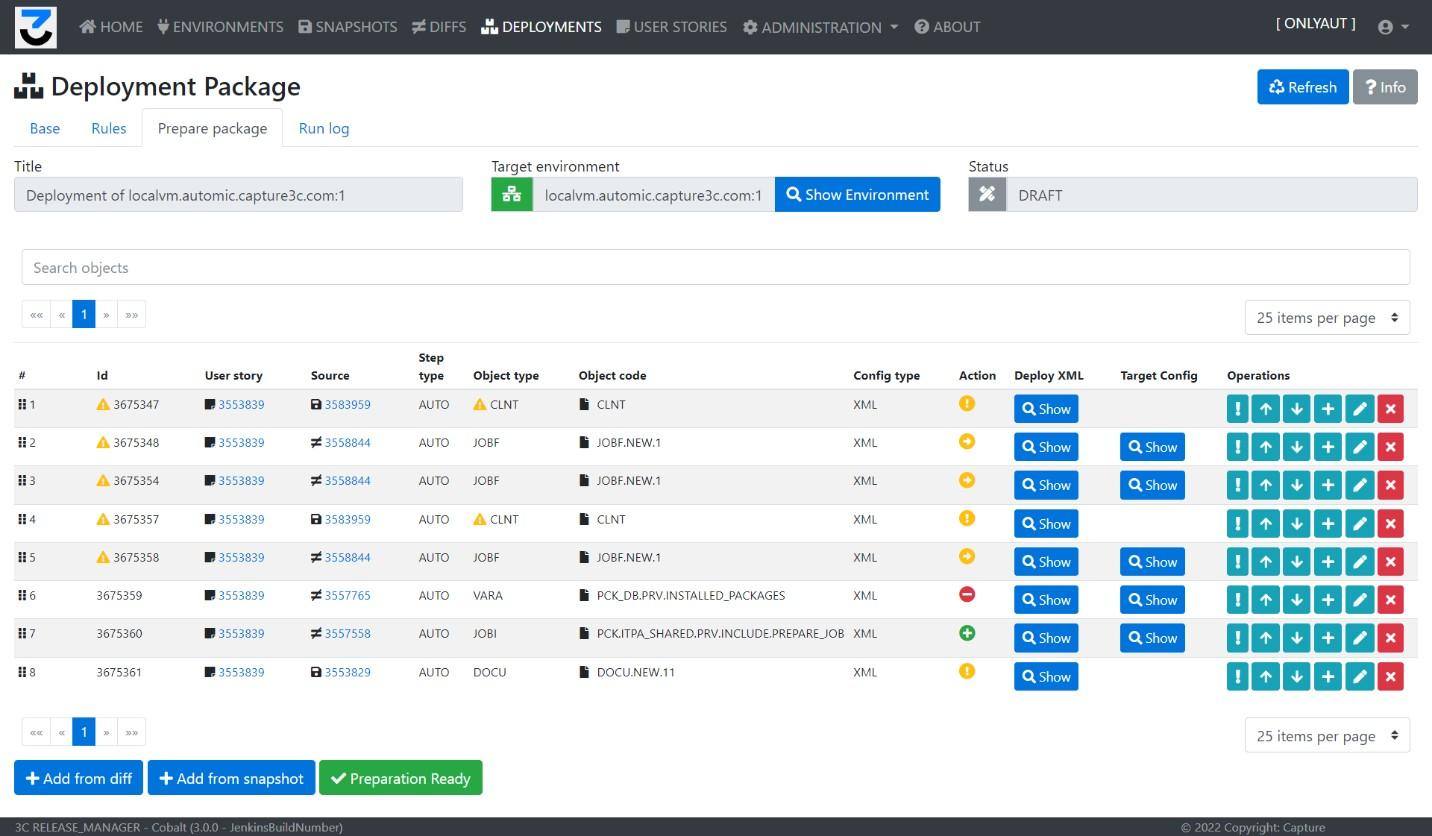
Similarly to user story contents, the Deployment Package contains steps that should be run during the process. The steps can be the following types:
- Create a new object (Create action)
- Delete an object (Remove action) — for Clarity, the deletion does not work automatically due to external system limitations
- Modify the configuration of an existing object
- Move an existing object to another folder — only relevant for Automic instances
- Manual steps — custom steps during the deployment process where the process should stop, so the administrator can finish some manual task
The objects can be added from a snapshot; Delete/Create/Move changes can be added from a diff.
Filter: Free text search within object codes or object types.
Fields:
- Number: the order of the steps. Records can be dragged and dropped by the user to reorder. The deployment steps will be done in script order during the process.
- Id: generated technical ID. If there is a warning for the record (like conflicts), a warning sign is also shown here.
- User story: the link of the originator user story
- Source: the link of the snapshot or diff from which the configuration originated
- Step type: AUTO or MANUAL
- Object type: if there are objects within the deployment that are generally not advised to be changed, a warning icon will be shown here
- Object code: the code of the object
- Config type: XML or JSON
- Action: the action that will be done during deployment
- Deploy XML: shows the object’s code that will be deployed on the target system
- Target config: shows the object’s code that will be overwritten on the target system
- Operations:
- Breakpoint: the deployment process will stop after this step until the user resumes the deployment
- Move up / down: reordering the steps
- +: creates a manual step after the selected one
- Note: opens the note for the deployment step
- Delete: removes the step from the deployment
Functions: Add from Diff (navigates to the Diff list with the current deployment selected for addition), Add from Snapshot, Preparation ready (changes the state of the deployment to “Prepared”), Start (only visible for deployments with Prepared state — starts the process and navigates to the Run Log tab).
Deployment step dialog

Shows the details of the deployment step, with the configuration that will be used during the deployment.
Fields: Source type (Snapshot or Diff), Id, Object source, Code, Object type, Source (the configuration of the object), Description, Notes.
Run log tab


After the deployment process is started, this log can be used to monitor the process. If the Backup Snapshot option is enabled, The 3C Release Manager will first create a snapshot that contains every item that will be changed during the deployment process. Once it is done, it will start with the first step.
If there were no manual steps or breakpoints set on the steps, every step will be done automatically, and then a Validation Snapshot will be created about the changes. If the deployment process stops, it can be continued using the Resume button, or the whole process can be shut down using the Cancel button.
If the process is paused, deployment steps can be Repeated or Skipped, and even additional Breakpoints can be added.
Functions:
- Pause: pauses the deployment process
- Resume: resumes a paused deployment process
- Cancel: panic button — stops the deployment process completely and sets the deployment to the Cancelled state
Deployment step cards:
- Number: the order number of the step
- Status: DONE, WAITING, IN_PROGRESS, ERROR
- ID: deployment step ID
- Type: Auto or Manual
- Object: the object type
- Code: the object code
- Config type: XML or JSON
- Title: the change’s title
- Execution list: if the step has already been done, the execution log will be shown here
- Details: shows the details and notes of the step
- Repeat: only visible if the process is paused — 3C will try to do the same step again
- Skip: only visible if the process is paused — 3C will not do the step
- Finish: only visible for manual steps — the user has to manually finish the task before the process is resumed
Execution details window

Shows the details of the execution of a deployment step.
Fields: Execution number (1 if there were no repetitions), Execution status (SUCCESS or ERROR), Start time, Finish time, Result (OK if success, otherwise the error message from the external system), Request (the configuration that was used for the deployment).
Validation tab

Only visible after the deployment has been finished. This screen collects the Backup Snapshot, Validation Snapshot, and Validation Diff details in one place. If everything went well, the diff analytics should show exactly what you intended to deploy on the target environment.
Functions:
- Rollback: in case of an error or an unsuccessful deployment, use the Rollback button. It will create a special Rollback Deployment that is the exact opposite of the current deployment, taking back the state of the objects using the Backup Snapshot. After creation, the Rollback Deployment works as a standard deployment and must be started manually.
User stories
User Stories serve as a logical container for changes that are connected to a business requirement. The advised way of using the 3C Release Manager is:
- Define user stories in the system, most probably originating from an external user story management system
- Create a snapshot from the development environment before the development starts
- Create a snapshot from the development environment after the development ended
- Create a diff analytics between the two snapshots
- Based on the differences, collect the individual changes and link them to the user stories. This way the team will have a clear understanding of why each configuration change was done, and what business requirements are affected by them.
Later, the user stories can be added to deployments to move the changes to the desired system.
User story list

Functions: Refresh, New User Story, Info.
Filters: Status filter (visible statuses), Sprint selection, Search field (free text in titles and descriptions).
Fields:
- ID: generated technical ID
- Name: the name of the user story
- Status: the actual status (DRAFT, WORK IN PROGRESS, READY FOR DEVELOPMENT, TESTING, DONE, etc.)
- Sprint: the sprint the user story is connected to
- Active system: the system that the actual status is connected to
- Deployments: the list of deployments that the user story is part of
- Show: navigates to the user story details screen
- Delete: deletes the user story
Create user story

This screen can be used to create new user stories in the 3C Release Manager. Note that new user stories can also be created from the Snapshot and Diff pages.
Fields:
- Product name: only visible if the 3C license key is valid for both Clarity and Automic
- Name: required, free text field
- User Story Number: optional, to store the ID of the user story in external ticketing systems, like Jira
- External link: optional, to store the link for the external ticket
- Description: free text description field
- Responsible user: optional, the 3C Release Manager user who is responsible for the user story
Functions: Cancel, Save.
Edit user story
The screen contains 5 different tabs: Description, Content, Conflict analysis, Deployment, Activities.
Description tab

Used to edit the basic data of the user story.
Fields:
- Product: only visible if both Clarity and Automic licenses are valid
- Story ID: generated technical ID
- Name: required, free text field
- User Story Number: optional, for external ticketing system reference
- External link: optional, for the external ticket URL
- Description: free text
- Responsible user: optional
- Parent user story: user stories can be organised into hierarchies — here the user can select another user story to be this one’s parent
- Children user stories: the list of user stories related to this one
- Status: the actual status (information field)
- Active system: the actual external system where the changes within the user story are already deployed
- Sprint: sprint management control to select an existing sprint or create a new one via dialog
- Created at / Last modification: read-only timestamps
Functions: Cancel, Save.
Content tab

The user can manage the contents of the user story: the actual configuration changes.
Filter: Search objects (free-form text search in object codes and types).
Fields:
- Id: generated technical ID of the config item
- Source: the source where the object or object change was added (snapshot or diff item)
- Object type: the type of the object
- Object code: the code of the object
- Action: Addition, Deletion, Change, Move, or Custom (in case of a manual step)
- Deploy XML: shows the configuration code of the object
- Notes: shows the user notes related to the object
- Delete: deletes the object from the user story
Functions: Add from Snapshot (navigates to the Snapshot list with the current user story selected for addition), Add from Diff, Add manual step (adds a custom step to the list).
Config item dialog
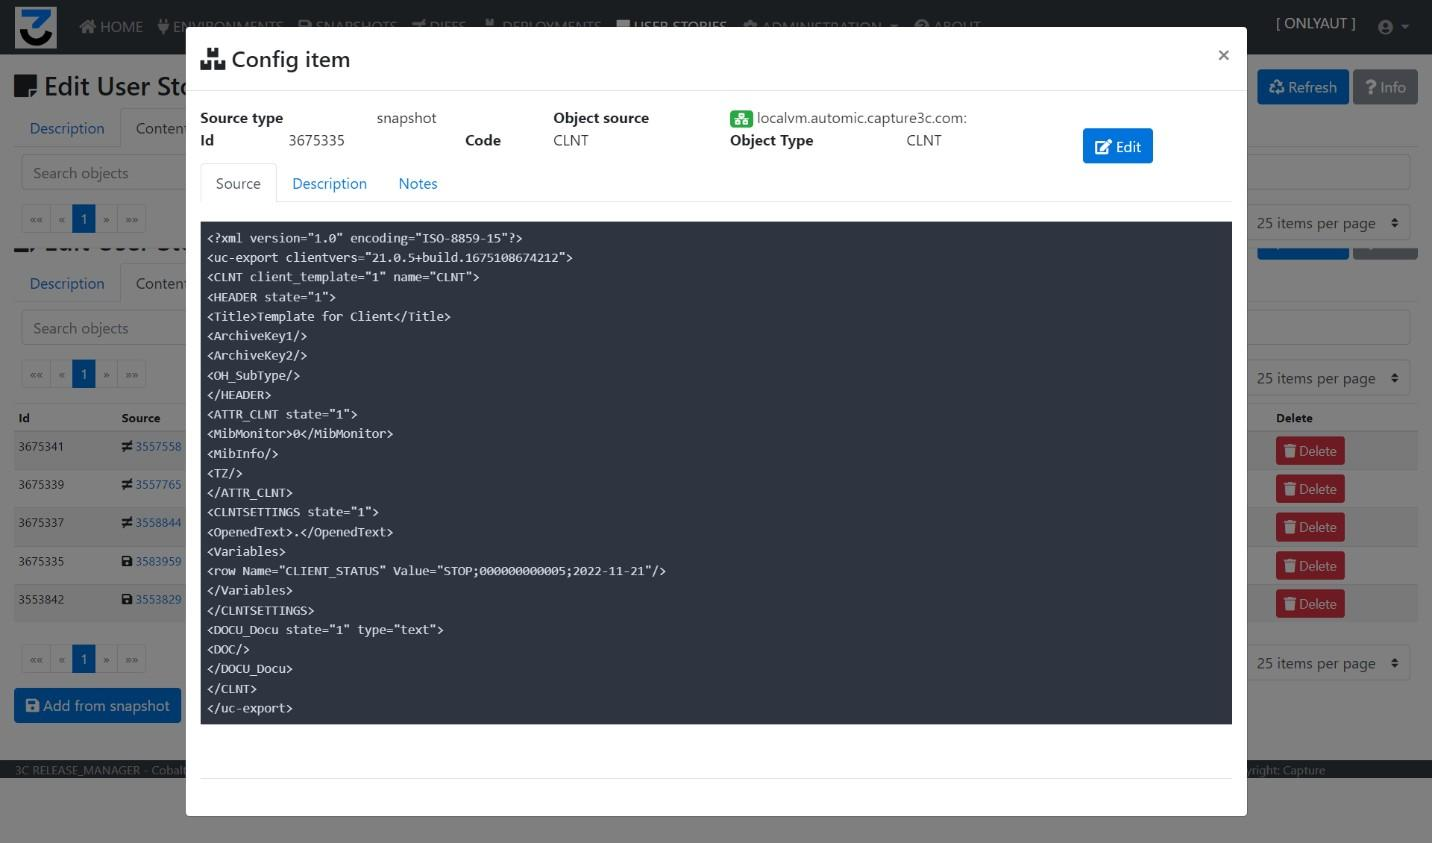
Shows the details of the selected configuration item, with its current code and other metadata.
Fields: Source type (Snapshot or Diff), Id, Object source, Code, Object type, Source (the configuration), Description, Notes.
Conflict analysis tab

This list shows every other user story that can conflict with the current one. Every user story will show up that contains changes for the same config items. The list also shows the conflicting object. This feature is designed to coordinate object changes for large development groups.
Fields:
- Story ID: the 3C ID of the conflicting user story
- User Story: the name of the conflicting user story
- Status: the current status of the conflicting user story
- Owner: the owner of the conflicting user story
- Conflicting object: the type and code of the object that is contained by the user story
- Show: navigates to the conflicting user story
Deployment tab

Used to add user stories to deployments. It also shows every deployment that contains the user story. The advised way of using the 3C Release Manager is to collect the changes to user stories, and the same user story should be added to the deployment of the Test environment and later to the Production environment.
Fields: Id, Title, Target environment, Status, Created at, Show, Delete.
Functions: Deployment selector (lists available deployments). On selecting a deployment, the Add to deployment button is shown. When – New deployment – is selected, the Create new deployment button is visible, opening the deployment creation dialog box.
Activities tab
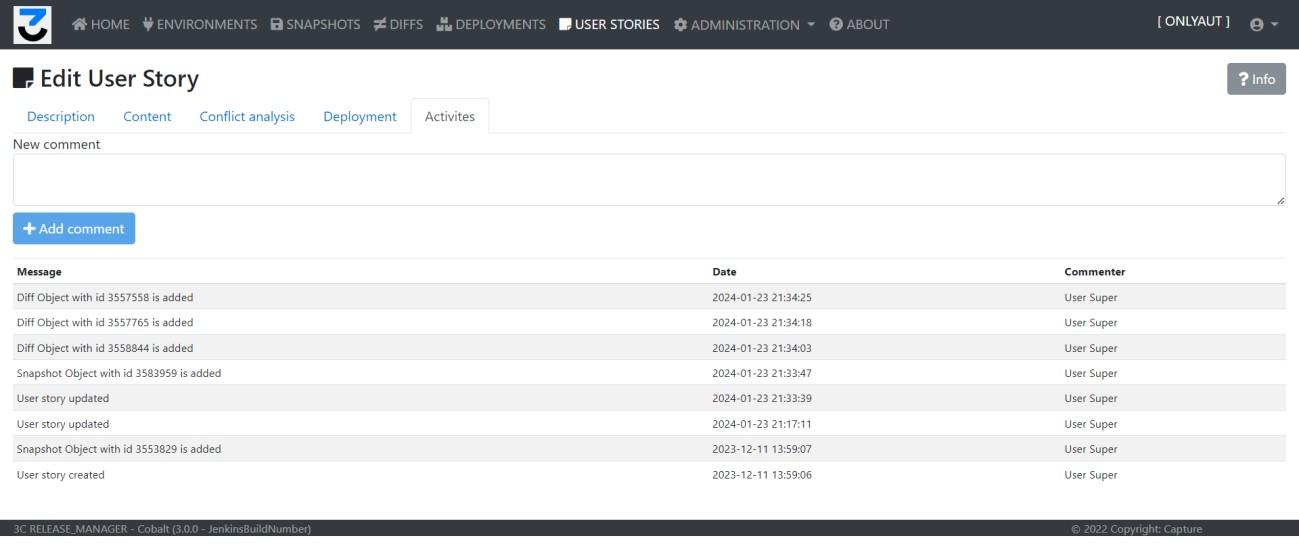
Used for audit purposes — shows the modifications done on the user story. Manual comments can also be added here.
Upgrade & migration
3C Release Manager upgrades follow the same two flavours as the initial 3C Release Manager installation: manual and guided. The examples use generic values; ensure these are replaced with the correct values for the target 3C Release Manager environment.
Upgrade — manual
Copy the new WAR files to <TOMCAT_HOME>/webapps/:
- threec.war
- threec-auth.war
- threec-backend.war
- threec-frontend.war
Remove the following folders from <TOMCAT_HOME>/work/Catalina/localhost:
- threec
- threec-auth
- threec-backend
- threec-frontend
- Restart Apache Tomcat.
- Verify successful deployment via Tomcat logs and application URLs.
Upgrade — guided

Enter the following directories, which have to be available:
- Tomcat HOME directory (e.g. c:/Automic/Tomcat-3C)
- Java HOME directory (e.g. c:/Program Files/Java/jdk-17)


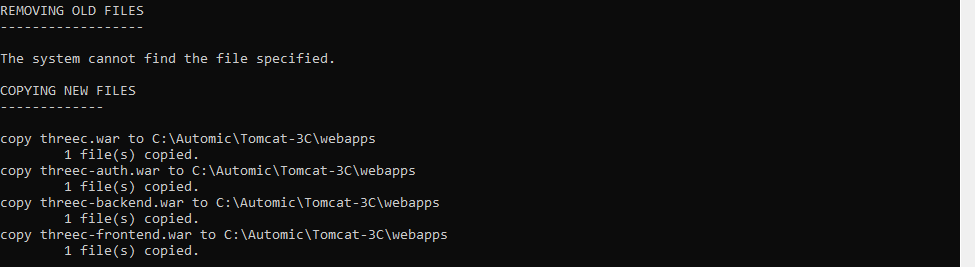

- Restart Apache Tomcat.
- Verify successful deployment via Tomcat logs and application URLs.
Release notes
Recent 3C Release Manager versions and what changed in each.
v3.3.4
| Type | Description |
|---|---|
| Enhancement | 4-eyes principle |
| Bugfix | GUI installer bugfixes |
v3.3.3
| Type | Description |
|---|---|
| Enhancement | Added GUI installer |
| Bugfix | Various bugfixes |
v3.3.2
| Type | Description |
|---|---|
| Bugfix | Object count limitations fixed — queries improved |
| Enhancement | Deployment speed improved |
v3.3.1
| Type | Description |
|---|---|
| Enhancement | Added import/export functionality to support snapshot ZIP file imports and exports |
| Enhancement | Enhanced JSON and XML import parsing to handle blueprint structures and preserve object identity |
| Enhancement | Refined snapshot started and ended timestamp handling during import |
v3.3.0
| Type | Description | Notes |
|---|---|---|
| Enhancement | Added custom roles | |
| Enhancement | 3C blueprint handling | Support Clarity 16.3.3 |
| Enhancement | Subtabs in blueprint module | Support Clarity 16.3.3 |
| Bugfix | Minor bugfixes for stability and maintainability |
Frequently asked questions
Click any question to expand the answer.
What is 3C Release Manager and what does it do?
3C Release Manager is a transport, comparison, and deployment tool for Automic Automation that revolutionises how configurations move between DEV, TEST, UAT, and PROD environments. It extends the standard Automic transport case with snapshot-based configuration capture, diff analysis between environments and points in time, deployment packages with automatic rollback, user-story-based change grouping, and optional Git synchronisation.
3C Release Manager runs as a Java/Spring web application on Apache Tomcat with a PostgreSQL backend, integrating with Automic Automation Engine V21 or higher via the Java API over TLS.
Which Automic versions are supported?
3C Release Manager requires Automic Automation Engine V21 or higher. The integration uses the Automic Java API over TLS-secured communication. You need one or more configured Automic clients per instance and TLS-compatible certificates.
The 3C Release Manager also supports Clarity PPM as an alternative target system if your license includes the Clarity module — both can be managed from the same 3C instance.
What are the technical requirements for installing the 3C Release Manager?
The 3C Release Manager is platform-independent and can be deployed on Microsoft Windows (64-bit) or Linux (64-bit, any modern vendor-supported distribution like RHEL, Rocky Linux, Ubuntu LTS). The required components are:
- Java 21 (Open Edition / OpenJDK)
- Apache Tomcat 10 with HTTPS/TLS enabled
- PostgreSQL 15 with JDBC connectivity
- Network access from the 3C backend to your Automic instances
- TLS-compatible certificates for the Automic communication
How are passwords stored?
For 3C users, the passwords are stored in a hashed format. For the external environments (Automic instances), the password is stored using two-way encryption — this is necessary so that 3C can connect to the external system on behalf of the configured technical user.
What is the default login name and password after installation?
The default super user credentials after a fresh installation are: username super, password super. Change this immediately after first login via the My Profile page.
What is the difference between a Snapshot and a Diff?
A Snapshot is a representation of an Automic environment’s configuration at a specific point in time. 3C connects to the environment and downloads every configuration object based on the configured filters. Snapshots serve as configuration history, system backups, and the source for deployment packages.
A Diff is a comparison between two snapshots — or between two environments, in which case 3C creates the snapshots on the fly. Diffs reveal what differs between source and target: newly created objects, deleted ones, modifications, and moves. They are typically the starting point for scoping a deployment.
Why does my first snapshot take so long compared to later ones?
The 3C Release Manager exports and saves objects in an incremental way. The first snapshot of a fresh environment must download every configuration object, which takes time. Every subsequent snapshot only stores the objects that have changed since the previous snapshot — that significantly reduces both the runtime and the database consumption.
To speed up snapshots in general, consider configuring filters that exclude irrelevant configuration types, so only the important objects are captured.
How does the rollback work if a deployment fails?
Every deployment automatically creates a Backup Snapshot before running, which contains every item that will be changed during the deployment process. After the deployment, a Validation Snapshot is created to verify the changes.
If something goes wrong, the Validation tab provides a Rollback button. It creates a special Rollback Deployment that is the exact opposite of the original deployment, restoring the affected objects from the Backup Snapshot. The rollback works as a standard deployment and must be started manually.
Can multiple development teams work in parallel without overwriting each other’s changes?
Yes. The Conflict Analysis tab on every user story automatically lists every other user story that contains changes for the same configuration items. The view shows which conflicting object is affected, who owns the conflicting story, and its current status — and lets you navigate directly to the conflicting story.
This is designed specifically to coordinate object changes for large development groups, where parallel work on the same Automic objects would otherwise lead to silent overwrites during deployment.
How do I integrate 3C with Git (GitHub or Bitbucket)?
Git integration in the 3C Release Manager is a two-step setup:
1. Tenant-level Git settings. An administrator configures the Git repository URL and the connection method (Credentials with username/password, or SSH with private key) under Administration → Git settings. The technical user must have commit and push permissions on the repository.
2. Per-environment Git Sync. On each environment’s Git Settings tab, set a branch name (created automatically if it does not exist) and toggle Git Sync Enabled. From then on, every successful snapshot writes the configuration to the file system and commits/pushes the changes to the configured branch automatically.
What happens to objects in the history when they get deleted from the external system?
Deleted objects remain visible in the 3C history based on the earlier snapshots that captured them. You can still access their previous configuration via the History view of the Object list, even though the object no longer exists in the source Automic instance. This makes 3C a reliable audit and forensics source even for objects that have been removed from the running system.
How can I perform mass changes (e.g. host renames) during a deployment?
The 3C Release Manager supports rule-based mass changes during deployment using the same syntax as the Automic AEDB Change utility. You can define rulesets at two levels:
- Per environment — under the environment’s Deployment Rules tab. These rules are copied as defaults to any new deployment targeting that environment.
- Per deployment — under the deployment’s Rules tab. The default ruleset from the environment is copied here automatically and can be edited or removed.
When a deployment runs, the rules are applied automatically to every object before it is written to the target system. Use the Validate button to check the ruleset for syntax errors before saving.
How do I check the database size and what is the expected growth?
To check the database size, use the PostgreSQL command line:
Or use this SQL query:
Reference value: 20 MB is the typical size for 1 snapshot of 2,600 configuration items (with a filter for 2 languages) plus 5 diffs with about 300 changes in each.
How does the 4-eyes principle for transport releases work?
The 4-eyes principle was introduced in 3C Release Manager version 3.3.4 to support environments where transport actions need explicit traceability — typically regulated industries or change-controlled IT organisations. It requires a second user to approve transport releases before they can be executed, ensuring that no single individual can deploy changes to a target environment unchecked.
Combined with the audit log (which captures every important system action with user, timestamp, and module), this provides the traceability that compliance-driven environments require.